
Alibaba Cloud DataWorks Node Types
DataWorks uses MaxCompute as the core computing and storage engine to provide massive offline data processing, analysis, and mining capabilities.

DataWorks is an important Alibaba Cloud Platform as a service (PaaS) product. It offers fully hosted workflow services and a one-stop data development and management interface to help enterprises mine and comprehensively explore data value.
DataWorks uses MaxCompute as the core computing and storage engine to provide massive offline data processing, analysis, and mining capabilities.
This topic describes how to apply the seven different node types in DataWorks in different scenarios.
Virtual node
Create a virtual node task
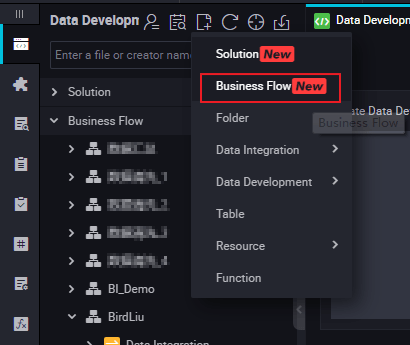
- Right-click Business Flow under Data Development, and select Create Business Flow.

- Right-click Data Development, and select .
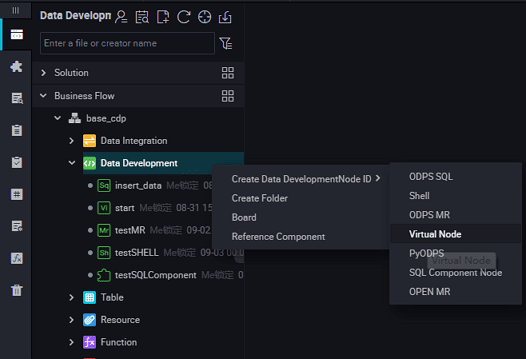
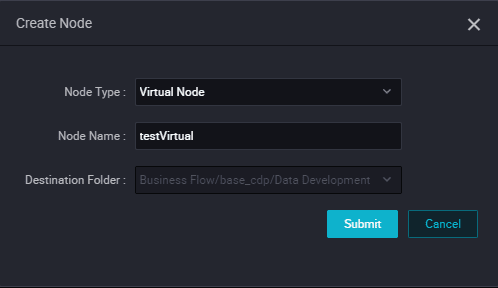
- Set the node type to Virtual Node, and enter the node name. Select the target folder, and click Submit.
- Edit the node code: You do not need to edit the virtual node code.
- Node scheduling configuration.
- Click the Schedule on the right-side of the node task editing area to go to the Node Scheduling Configuration page. For more information about scheduling configuration, see Scheduling configuration.
- Submit the node.
- After completing the configuration, click Save in the upper-left corner of the page or press Ctrl+S to submit (and unlock) the node to the development environment.
- Publish a node task.
- For more information about the operation, see Publish management.
- Test in the production environment.
For more information about the operation, see Cyclic task
ODPS SQL node
An ODPS SQL task allows you to edit and maintain the SQL code on the Web, and easily implement code runs, debug, and collaboration. DataWorks also provides code version management, automatic resolution of upstream and downstream dependencies, and other features.
By default, DataWorks uses the MaxCompute project as the space for development and production, so that the code content of the MaxCompute SQL node follows the MaxCompute SQL syntax . MaxCompute SQL syntax is similar to Hive, which can be considered a subset of the standard SQL. However, MaxCompute SQL cannot be equated with a database because it does not possess the following database features: transactions, primary key constraints, and indexes.
For more information about MaxCompute SQL syntax, see SQL overview.
- Right-click Business Flow under Data Development, and select Create Business Flow.

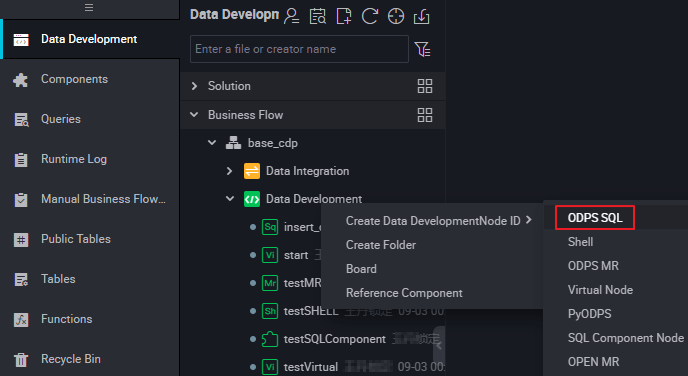
- Right-click Data Development, and select .
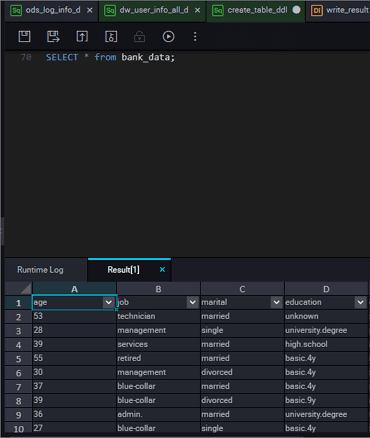
Query result display
DataWorks query results are connected to the spreadsheet function, making it easier for users to operate the data results.
The query results are displayed in spreadsheet style. Users can perform operations in DataWorks, open it in a spreadsheet, or freely copy content stations in local excel files.
- Hide column: Select one or more columns to hide the column.
- Copy row: Select one or more rows that need to be copied to the left side, and click Copy Row.
- Copy column: The top column selects a column or more points that need to be copied to the selected column.
- Copy: You can freely copy the selected content.
- Search: The search bar is displayed in the upper-right corner of the query results for facilitating data search in the table.
- Node scheduling configuration.
- Click Schedule on the right of the node task editing area to go to the Node Scheduling Configuration page. For more information about node scheduling configuration, see Scheduling configuration.
- Submit the node.
- After the configuration is completed, click Save in the upper-left corner of the page or press Ctrl+S to submit (and unlock) the node to the development environment.
- Publish a node task.
- For more information about the operation, see Release management.
- Test in the production environment.
- For more information about the operation, see Cyclic task.
ODPS MR node
The MaxCompute supports MapReduce programming APIs. You can use the Java API provided by MapReduce to write MapReduce programs for processing data in MaxCompute. You can create ODPS MR nodes and use them in Task Scheduling.
To use an ODPS MR node, you must upload and release the resource for usage, and then create the ODPS MR node.
Create a resource instance
Right-click Business Flow under Data Development, and select Create Business Flow.
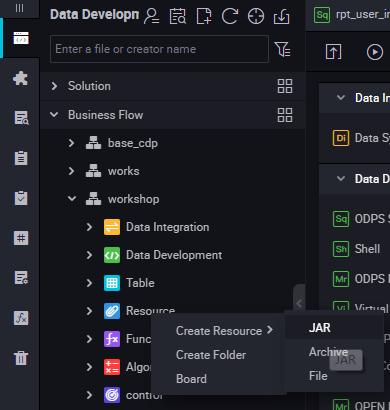
Right-click Resource, and select .
Enter the resource name in Create Resource according to the naming convention, and set the resource type to JAR, and then select a local JAR package.
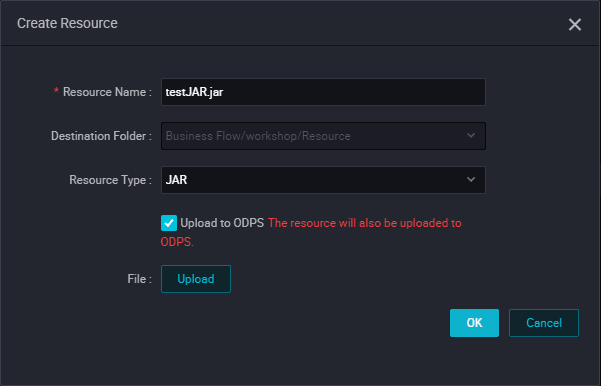
Click Submit to submit the resource to the development scheduling server.

Publish a node task.
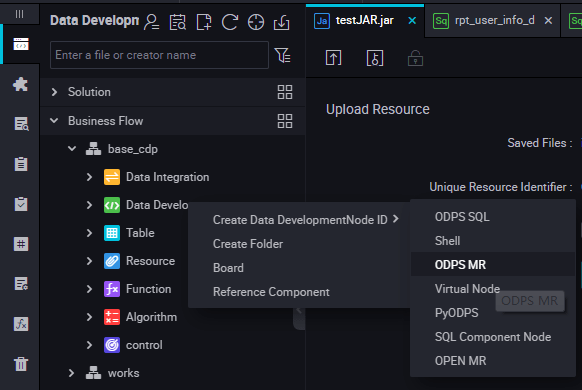
Create an ODPS MR node
Right-click the Business Flow under Data Development, and select Create Business Flow.

Right-click Data Development, and select .
Edit the node code. Double click the new ODPS MR node and enter the following interface:

The node code editing example as follows:
jar -resources base_test.jar -classpath ./base_test.jar com.taobao.edp.odps.brandnormalize.Word.NormalizeWordAllThe code description as follows:
- The code
-resources base_test.jarindicates the file name of the referenced JAR resource. - The code
-classpathis the JAR package path. - The code
com.taobao.edp.odps.brandnormalize.Word.NormalizeWordAllindicates the main class in the JAR package is called during execution. It must be consistent with the main class name in the JAR package.
When one MR calls multiple JAR resources, the classpath must be written as follows: -classpath ./xxxx1.jar,./xxxx2.jar, that is, two paths must be separated by a comma (,).
- Node scheduling configuration.
- Click the Schedule on the right of the node task editing area to go to the Node Scheduling Configuration page. For more information about node scheduling configuration, see Scheduling configuration.
- Submit the node.
- After completing the configuration, click Save in the upper-left corner of the page or press Ctrl+S to submit (and unlock) the node in the development environment.
- Publish a node task.
- For more information about the operation, see Release management.
- Test in the production environment.
- For more information about the operation, see Cyclic task.
PyODPS node
The PyODPS node type in DataWorks can be integrated with the Python SDK of MaxCompute. You can edit the Python code to operate MaxCompute on a PyODPS node of DataWorks.
The Python SDK provided in MaxCompute can be used to operate MaxCompute.
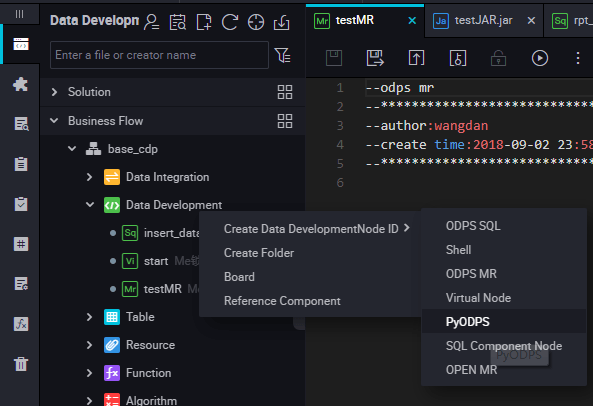
Create a PyODPS node
Right-click the Business Flow under Data Development, and select Create Business Flow.

Right-click Data Development, and select .
Edit the PyODPS node.
- MaxCompute portal
On DataWorks, the PyODPS node contains a global variable odps or o, which is the MaxCompute entry. You do not need to manually define a MaxCompute entry.
print(odps.exist_table('PyODPS_iris')) - Run the SQL statements PyODPS supports MaxCompute SQL query and can read the execution result. The return value of the execute_sql or run_sql method is the running instance.
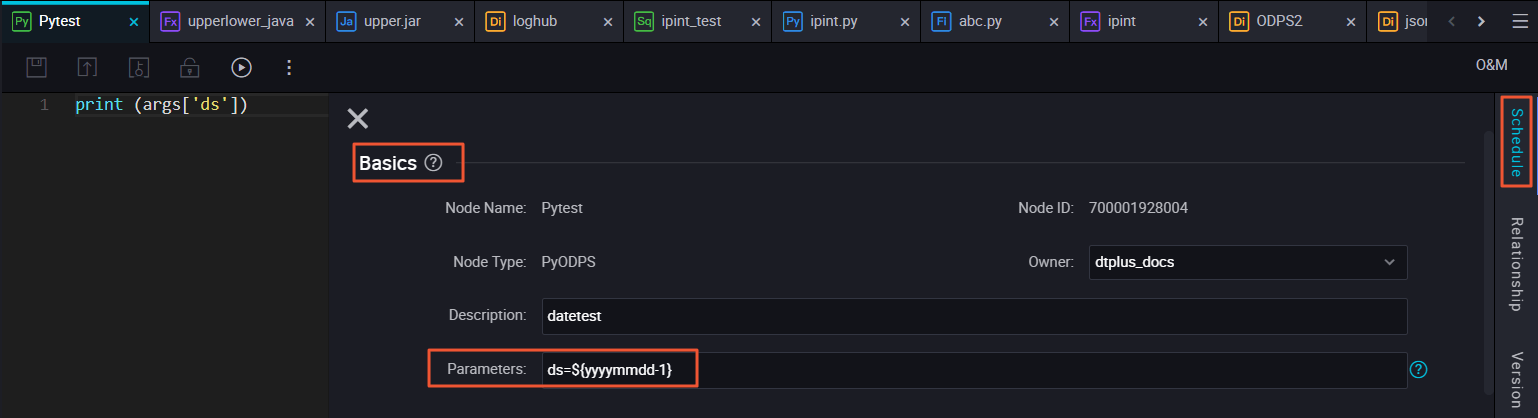
- Configure the runtime parameters
The runtime parameters must be set sometimes. You can set the hints parameter with the dict parameter type.
o.execute_sql('select * from PyODPS_iris', hints={'odps.sql.mapper.split.size': 16})After you add sql.settings to the global configuration, the related runtime parameters are added upon each running.python.
from odps import options options.sql.settings = {'odps.sql.mapper.split.size': 16} o.execute_sql('select * from PyODPS_iris') # "hints" is added based on the global configuration. - Read the SQL statement execution results
The instance that runs the SQL statement can perform the open_reader operation. In this case, the structured data is returned as the SQL statement execution result.
with o.execute_sql('select * from dual').open_reader() as reader:
for record in reader:  # Process each record.
In another case, desc may be executed in an SQL statement. In this case, the original SQL statement execution result is obtained through the reader.raw attribute.
with o.execute_sql('desc dual').open_reader() as reader:
print(reader.raw)
You can configure system parameters as following:
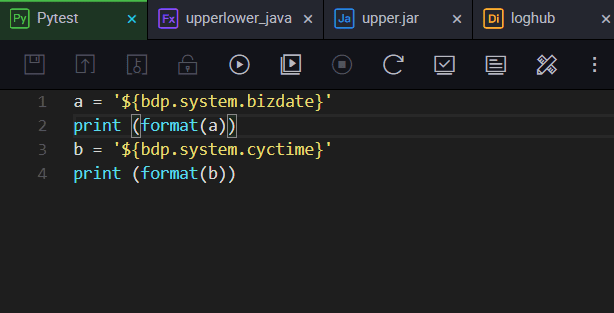
You can configure user-defined parameters as following.
- Node scheduling configuration.
Click the Schedule on the right of the node task editing area to go to the Node Scheduling Configuration page. For more information, see Scheduling configuration.
- Submit the node.
After completing the configuration, click Save in the upper-left corner of the page or press Ctrl+S to submit (and unlock) the node in the development environment.
- Publish a node task.
For more information about the operation, see Release management.
- Test in the production environment.
For more information about the operation, see Cyclic task.
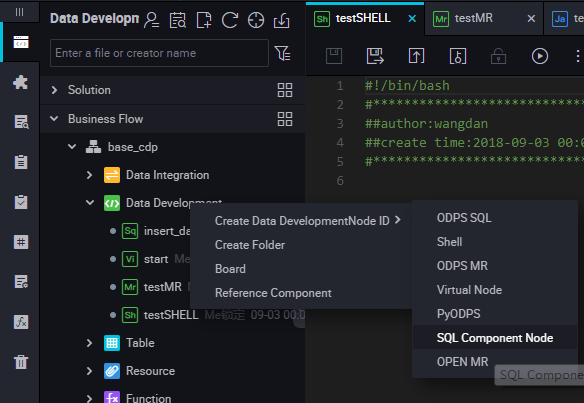
SQL component node
An SQL component node is an SQL code process template that contains multiple input and output parameters. To handle an SQL code process, you need to import, filter, join, and aggregate one or more data source tables to form a target table required for new business.
Procedure
Right-click the Business Flow under Data Development, and select Create Business Flow.

Right-click Data Development, and select .
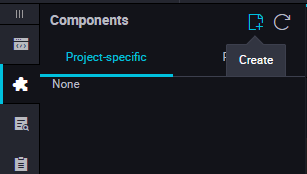
To improve the development efficiency, the data task developers can use components contributed by project and tenant members to create data processing nodes.
- Components created by members of the local project are under Project Components.
- Components created by tenant members are located under Public Components.
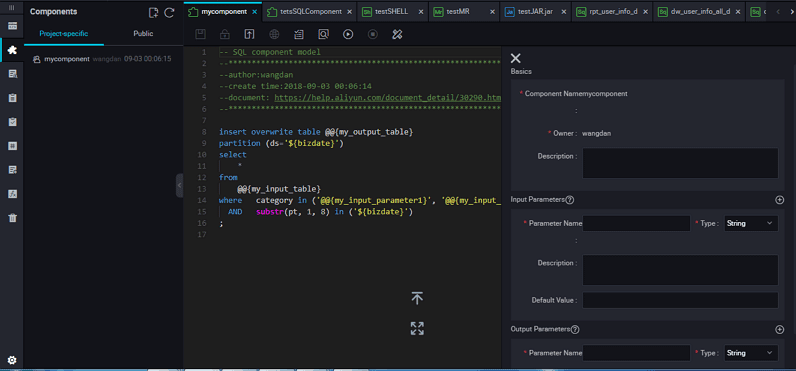
When you create a node, set the node type to SQL Component node, and specify the node name.
Specify parameters for the selected component.
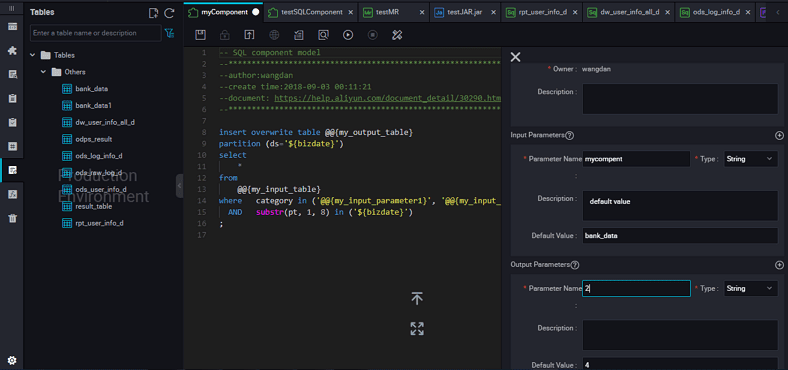
-
Enter the parameter name, and set the parameter type to Table or String.
Specify the three get_top_n parameters in sequence.
Specify the following input table for the Table type: test_project.test_table parameters.
- Node scheduling configuration.
Click the Scheduling Configuration on the right of the node task editing area to go to the Node Scheduling Configuration page. For more information, see Scheduling configuration.
- Submit a node.
After completing the configuration, click Save in the upper-left corner of the page or press Ctrl+S to submit (and unlock) the node in the development environment.
- Publish a node task.
For more information about the operation, see Publish management.
- Test in a production environment.
For more information about the operation, see Cyclic task.
Upgrade the SQL component node version
After the component developer releases a new version, the component users can choose whether to upgrade the used instance of the existing component to the latest used component version.
With the component version mechanism, developers can continuously upgrade components and component users can continuously enjoy the improved process execution efficiency and optimized business effects after upgrading the components.
For example, user A uses the v1.0 component developed by user B, and user B upgrades the component to V.2.0. User A can still use the v1.0 component after the upgrade, but will receive an upgrade reminder. After comparing the new code with the old code, user A finds that the business effects of the new version are better than that of the old version, and therefore can determine whether to upgrade to the latest version of the component.
You can easily upgrade an SQL component node based on the component template, by selecting Upgrade. After checking whether the SQL component node parameter settings are effective in the new version, and then make some adjustments based on the new version component instructions, and then submit and release the node similar to a common SQL component node.
Interface functions
The interface features are described below:
| No. | Feature | Description |
|---|---|---|
| 1 | Save | Saves the current component settings. |
| 2 | Steal lock edit | Steals lock edit of the node if you are not the owner of the current component. |
| 3 | Submit | Submit the current component in the development environment. |
| 4 | Publish component | Publish a universal global component to the entire tenant, so that all users in the tenant can view and use the public component. |
| 5 | Resolve input and output parameters | Resolve the input and output parameters of the current code. |
| 6 | Precompilation | Edit the custom and component parameters of the current component. |
| 7 | Run | Run the component locally in the development environment. |
| 8 | Stop run | Stop a running component. |
| 9 | Format | Sort the current component code by keyword. |
| 10 | Parameter settings | View the component information, input parameter settings, and output parameter settings. |
| 11 | Version | View the submission and release records of the current component. |
| 12 | Reference records | View the usage record of the component. |
Summary
In this blog, you’ve got to see a bit more about Alibaba Cloud DataWorks Node Types to take advantage of all of the features included in DataWorks to help kickstart your data processing and analytics workflow.