
Alibaba Cloud DataWorks Scheduling Configuration
DataWorks Schedules millions of tasks concurrently to ensure the stability of your service.
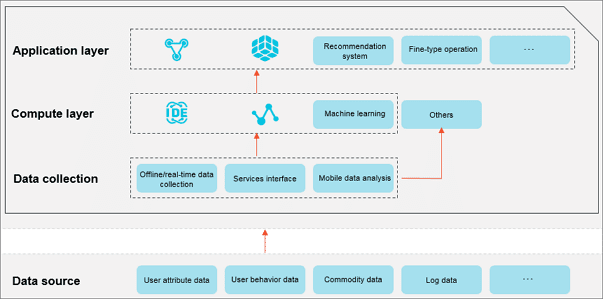
DataWorks Schedules millions of tasks concurrently to ensure the stability of your service. DataWorks provides a unified task scheduling platform and supports the scheduling of millions of tasks to streamline data processing. DataWorks provides a DAG-based visual interface. DataWorks allows you to create minutely, hourly, daily, weekly, and monthly schedules. DataWorks allows you to create different types of alarms to monitor task status.
Basic attributes
The figure below shows the basic attribute configuration interface:
- Node Name: The node name of the created workflow node. To modify the node name, right-click the node on the directory tree and choose Rename from the short-cut menu.
- Node ID: The unique node ID generated when a task is submitted and cannot be modified.
- Node Type: The node type that you select when creating a workflow node and cannot be modified.
- Owner: The node owner. By default, the owner of a newly created node is the current logon user. To modify the owner, click the input box, and enter the owner name or select another user.
- Description: Generally used to describe the business and node purpose.
- Parameter: A parameter used to assign value to a variable in the code during task scheduling.
For example, when a variable “pt=${datetime}” is used to indicate the code time, you can assign a value to the variable here. The assigned value can use the scheduling built-in time parameter “datetime=$bizdate”.
Parameter value assignment formats for various node types
- ODPS SQL, ODPS PL, ODPS MR types:
Variable name 1=Parameter 1 Variable name 2=Parameter 2..., separate multiple parameters with spaces. - SHELL type:
Parameter 1 Parameter 2..., separate multiple parameters with spaces.
Some frequently-used time parameters are provided as built-in scheduling parameters.
Parameter configuration
In common data R&D scenarios, the node code of various types does not remain unchanged after compilation every time when it is called. Before calculation, You need to dynamically import values such as the date and time based on requirement changes and time changes to replace variable values.
DataWorks provides the parameter configuration feature to apply to such business scenarios. After configuring parameters, you can assign them to nodes that are automatically and periodically scheduled to parse the required values. Currently, parameters are divided into system parameters and custom parameters (recommended). This section describes the parameters in detail and uses examples to show how to operate them.
Parameter types
| Parameter type | Call method | Applicable type | Parameter text box example |
|---|---|---|---|
| System parameters: including bdp.system.bizdate and bdp.system.cyctime | To use the system parameters in the scheduling system, directly reference ${bdp.system.bizdate} and ${bdp.system.cyctime} in the code without having to set them in the Parameter text box. The system automatically replaces the values of the parameters. | All node types | None |
| Non-system parameters: custom parameters (recommended) | Reference ${key1},${key2} in the code and enter “key1=value1 key2=value2” in the Parameter text box. | Non-SHELL nodes |
|
| Reference $1 $2 $3 in the code and enter “value1 value2 value3” in the Parameter text box. | Shell nodes | Constant parameters: “abc” 1234
Variables: $[yyyymmdd], which is calculated based on the value of bdp.system.cyctime. |
As described in the preceding table, The variable values are based on the values of system parameters. You can use custom variables to flexibly define the obtained part and format.
Choose and assign values to non-system parameters in the Parameter text box (assign values to scheduling variables). Note the following when configuring parameters:
- No space can be added on either side of the equation mark (=) of a parameter. Correct example:
bizdate=$bizdate
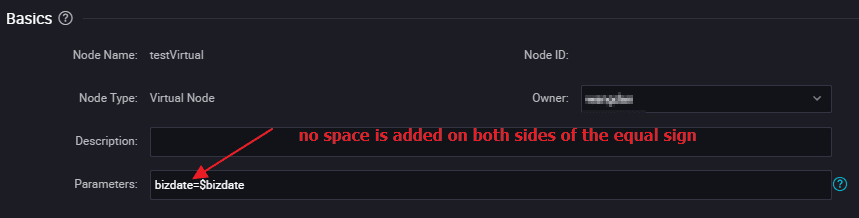
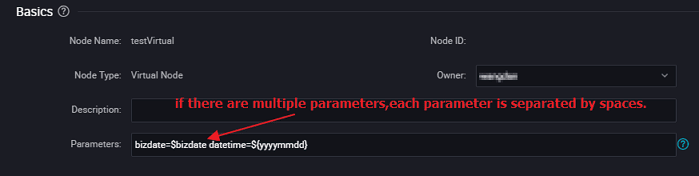
- Multiple parameters (if any) must be separated with spaces.
System parameters
DataWorks provides two system parameters, which are defined as follows:
- ${bdp.system.cyctime}: The scheduled runtime of an instance. Default format: yyyymmddhh24miss.
- ${bdp.system.bizdate}: The business date on which an instance is calculated, in the default format of yyyymmdd. The default business date is one day before the scheduled runtime.
According to the definitions, the formula for calculating the scheduled runtime and business date is as follows: Scheduled runtime = Business date + 1.
Example of system parameters
Set a MaxCompute SQL node to be run once every hour from 00:00 to 23:59 every day. To use system parameters in the code, follow these steps:
- Directly reference system parameters in the code. The node code is as follows:
insert overwrite table tb1 partition(ds ='20150304') select c1,c2,c3 from ( select * from tb2 where ds ='${bdp.system.cyctime}') t full outer join( select * from tb3 where ds = '${bdp.system.bizdate}') y on t.c1 = y.c1; - After the preceding step, your node is partitioned by using the system parameters. Set the scheduling time attributes and scheduling dependencies. In this example, Recurrence is set to Hour.
- After setting the scheduling cycle and dependency, submit the node. You can check the node in O&M. The node generates periodic instances during running from the second day. You can right-click an instance and select View Log to view the time when the system parameters are parsed.
For example, the scheduling system creates 24 running instances for the node on January 14, 2019. Because the business date is January 13, 2019 (the day before the running date) for all instances, ${bdp.system.bizdate} is always displayed as 20190113. The runtime is the running date plus the scheduled time. Therefore, ${bdp.system.cyctime} is displayed as 20190114000000 plus the scheduled time of each instance.
Open the run logs of each instance and search for the replaced values of parameters in the code:
- Because the scheduled time for the first instance is 2019-01-14 00:00:00, bdp.system.bizdate is replaced with 20190113, and bdp.system.cyctime is replaced with 20190114000000.
- Because the scheduled time for the second instance is 2019-01-14 01:00:00, bdp.system.bizdate is replaced with 20190113, and bdp.system.cyctime is replaced with 20190114010000.
- Similarly, because the scheduled time for the twenty-fourth instance is 2019-01-14 23:00:00, bdp.system.bizdate is replaced with 20190113, and bdp.system.cyctime is replaced with 20190114230000.
Custom parameters for non-SHELL nodes
Example of custom parameters for non-SHELL nodes
Set a MaxCompute SQL node to run once every hour from 00:00 to 23:59 every day. To use the custom variables thishour and lasthour in the code, follow these steps:
- Reference the parameters in the code as follows:
insert overwrite table tb1 partition(ds ='20150304') select c1,c2,c3 from ( select * from tb2 where ds ='${thishour}') t full outer join( select * from tb3 where ds = '${lasthour}') y on t.c1 = y.c1; - Choose and assign values to the variables referenced in the code in the Parameter text box.
Configure the custom parameters as follows:
- thishour=$[yyyy-mm-dd/hh24:mi:ss]
- lasthour=$[yyyy-mm-dd/hh24:mi:ss-1/24]
- You can enter
thishour=$[yyyy-mm-dd/hh24:mi:ss] lasthour=$[yyyy-mm-dd/hh24:mi:ss-1/24]in the Parameter text box. - Set the node to be run once every hour.
- After setting the scheduling cycle and dependency, submit the node. You can check the node in O&M. The node generates periodic instances during running from the second day. You can right-click an instance and select View Log to view the time when the custom parameters are parsed. Because the value of cyctime is 20190114010000, the value of thishour is 2019-01-14/01:00:00, and the value of lasthour, which represents the last hour, is 2019-01-14/00:00:00.
Custom parameters for SHELL nodes
The parameter configuration procedure of a SHELL node is similar to that of a non-SHELL node except that the rules are different. For a SHELL node, variable names cannot be customized. Instead, they must be named $1, $2, $3, and so on. For example, for a SHELL node, the SHELL syntax declaration in the code is: $1 is configured as $xxx (built-in scheduling parameter) during scheduling parameter configuration for the node. That is, the value of $xxx is used to replace $1 in the code.
Example of custom parameters for SHELL nodes
Set a SHELL node to be run once at 01:00 each day. To use the custom constant parameter myname and the custom variable parameter ct in the code, follow these steps:
- Reference the parameters in the code as follows:
echo "hello $1, two days ago is $2, the system param is ${bdp.system.cyctime}"; - Choose and assign values to the variables referenced in the code in the Parameter text box. Value assignment rule: parameter 1 parameter 2 parameter 3 … ( Replaced variables are parsed based on the parameter location, for example, $1 is replaced with the value of parameter 1). In this example, set $1 and $2 to abcd and $[yyyy-mm-dd-2], respectively.
- Set the node to be run once at 01:00 every day.
- After setting the scheduling cycle and dependency, submit the node. You can check the node in O&M. The node generates periodic instances during running from the second day. Right-click an instance and select View Log. The logs show that $1 in the code is replaced with constant abcd, $2 is replaced with 2019-01-12 (two days before the running date), and ${bdp.system.cyctime} is replaced with 20190114010000.
Custom variables
A custom variable can be a constant parameter or a built-in scheduling parameter.
Variable value being a constant value
For example, an SQL node includes the variable ${Variable name} in the code. Configure the parameter item Variable name=’Fixed value’ for the node.
Code: select xxxxxx type=’${type}’
Value assigned to the scheduling variable: type=’aaa’
When the node is being scheduled, the variable in the code is replaced with type=’aaa’.
Variable value being a variable
Variables are built-in scheduling parameters whose values depend on the system parameters ${bdp.system.bizdate} and ${bdp.system.cyctime}.
For example, an SQL node includes the variable ${Variable name} in the code. Configure the parameter item Variable name=Scheduling parameter for the node.
Code: select xxxxxx dt=${datetime}
Value assigned to the scheduling variable: datetime=$bizdate
When the node is being scheduled on July 22, 2017, the variable in the code is replaced with dt=20170721.
List of variables
$bizdate: The business date in the format of yyyymmdd. Note: For daily scheduling, this parameter is set to the day before the current date by default.
For example, the code of a MaxCompute SQL node includes pt=${datetime}, and the parameter configured for the node is datetime=$bizdate. When the node is run on July 22, 2017, $bizdate is replaced with pt=20170721.
$cyctime: The time at which the node is scheduled to run. If no scheduling time is configured for a daily node, cyctime is set to 00:00 of the current day. The time is accurate to the second. This parameter is usually used for nodes that are scheduled by hour or minute. Example: cyctime=$cyctime.
Examples of $cyctime: (Assume that $cyctime=20140515103000)
- $[yyyy] = 2014, $[yy] = 14, $[mm] = 05, $[dd] = 15, $[yyyy-mm-dd] = 2014-05-15, $[hh24:mi:ss] = 10:30:00, $[yyyy-mm-dd hh24:mi:ss] = 2014-05-1510:30:00
- $[hh24:mi:ss – 1/24] = 09:30:00
- $[yyyy-mm-dd hh24:mi:ss -1/24/60] = 2014-05-1510:29:00
- $[yyyy-mm-dd hh24:mi:ss -1/24] = 2014-05-15 09:30:00
- $[add_months(yyyymmdd,-1)] = 20140415
- $[add_months(yyyymmdd,-12*1)] = 20130515
- $[hh24] =10
- $[mi] =30
Method for testing $cyctime:
After the instance start to run, right-click the node and select View Node Attribute. Check whether the scheduling time is the time at which the instance is run periodically.
The value of the parameter in Running Parameter is replaced with the scheduling time minus 1 hour.
$jobid: The ID of the workflow to which a node belongs. Example: jobid=$jobid.
$nodeid: The ID of a node. Example: nodeid=$nodeid.
$taskid: The ID of a node, that is, the ID of a node instance. Example: taskid=$taskid.
$bizmonth: The business month in the format of yyyymm.
- Note: If the month of a business date is equal to the current month, the value of $bizmonth is the month of the business date minus 1. Otherwise, the value of $bizmonth is the month of the business date.
- For example, the code of a MaxCompute SQL node includes pt=${datetime}, and the parameter configured for the node is datetime=$bizmonth. When the node is run on July 22, 2017, $bizmonth is replaced with pt=201706.
$gmtdate: The current date in the format of yyyymmdd. The value of this parameter is the current date by default. During data patching, the value of gmtdate that is imported is the business date plus 1.
For example, the code of a MaxCompute SQL node includes pt=${datetime}, and the parameter configured for the node is datetime=$gmtdate. When the node is run on July 22, 2017, $gmtdate is replaced with pt=20170722.
${…} custom parameter
- You can customize a time format based on $bizdate, where yyyy indicates the four-digit year, yy indicates the two-digit year, mm indicates the month, and dd indicates the day. You can use any combination of these parameters, for example, ${yyyy}, ${yyyymm}, ${yyyymmdd}, and ${yyyy-mm-dd}.
- $bizdate is accurate to the day. Therefore, ${…} can only represent the year, month, or day.
- Methods for obtaining the period plus or minus a certain duration:
Next N years: ${yyyy+N}
Previous N years: ${yyyy-N}
Next N months: ${yyyymm+N}
Previous N months: ${yyyymm-N}
Next N weeks: ${yyyymmdd+7*N}
Previous N weeks: ${yyyymmdd-7*N}
Next N days: ${yyyymmdd+N}
Previous N days: ${yyyymmdd-N}
${yyyymmdd}: The business date in the format of yyyymmdd. The value of this parameter is the same as that of $bizdate, and the parameter supports various separators, for example, yyyy-mm-dd.
- Note: For daily scheduling, this parameter is set to the day before the current date by default. You can customize a time format for this parameter, for example, yyyy-mm-dd for ${yyyy-mm-dd}.
-
Examples:
- The code of a MaxCompute SQL node includes pt=${datetime}, and the parameter configured for the node is datetime=${yyyy-mm-dd}. When the node is run on July 22, 2018, ${yyyy-mm-dd} is replaced with pt=2018-07-21.
- The code of a MaxCompute SQL node includes pt=${datetime}, and the parameter configured for the node is datetime=${yyyymmdd-2}. When the node is run on July 22, 2018, ${yyyymmdd-2} is replaced with pt=20180719.
- The code of a MaxCompute SQL node includes pt=${datetime}, and the parameter configured for the node is datetime=${yyyymm-2}. When the node is run on July 22, 2018, ${yyyymmdd-2} is replaced with pt=201805.
- The code of a MaxCompute SQL node includes pt=${datetime}, and the parameter configured for the node is datetime=${yyyy-2}. When the node is run on July 22, 2018, ${yyyy-2} is replaced with pt=2016.
- You can assign values to multiple parameters during MaxCompute SQL node configuration, for example, startdatetime=$bizdate enddatetime=${yyyymmdd+1} starttime=${yyyy-mm-dd} endtime=${yyyy-mm-dd+1}.
Summary
In this blog, you’ve got to see a bit more about Alibaba Cloud DataWorks Scheduling Configurations to take advantage of all of the features included in DataWorks to help kickstart your data processing and analytics workflow.