
Introduction to Hyper-V and PowerShell
Hyper-V is Microsoft’s hypervisor that lets you run multiple virtual machines on a single physical host.
Hyper-V is Microsoft’s hypervisor that lets you run multiple virtual machines on a single physical host. Microsoft introduced Hyper-V in Windows Server 2008. Today, there are several ways to manage Hyper-V hosts:
- Hyper-V manager: This is the default tool used to manage Hyper-V. This tool also manages remote hosts. It allows you to manage virtual machines, but also the network configuration and all Hyper-V settings.
- System Center Virtual Machine Manager: This tool is part of the Microsoft System Center products. VMM centrally manages one or more Hyper-V hosts. It provides advanced Hyper-V administration and you can also manage VMware hosts by integrating your VMware vCenter.
- Windows PowerShell: To simplify the management, it is possible to use the Hyper-V PowerShell module to configure and work with your virtual machines. With PowerShell, you can accomplish most of the tasks that you can accomplish with the GUI.
PowerShell and Hyper-V
Why use PowerShell to manage Hyper-V? Of course, you can use the GUI to perform most of the actions that we will describe in this article. However, PowerShell has several advantages. It allows you to automate the tasks and gives you more flexibility. In some cases, you have no option to using PowerShell because Microsoft does not automatically include all the features of Hyper-V in the GUI.
The first step is to install Hyper-V on your Windows machine. Remember that it is possible to install Hyper-V not just on a Windows server, but also on Windows 10. Use this command to install it on Windows Server:
PS > Install-WindowsFeature -Name Hyper-V -IncludeManagementTools -Restart
Make sure that you include the -IncludeManagementTools parameter. This will install the Hyper-V Manager console and the Windows PowerShell module for Hyper-V.
Use this command to activate the role on Windows 10:
PS > Enable-WindowsOptionalFeature -Online -FeatureName Microsoft-Hyper-V -All
By Installing Hyper-V on Windows 10, you can use your own machine to test, and become familiar with, Hyper-V without any additional cost. All you need is a Windows machine with enough memory and processor to work comfortably.
Now you can use the Get-Command cmdlet to check if the PowerShell Hyper-V module is available:
PS > get-command -module Hyper-V

CommandType     Name                                               Version    Source
-----------     ----                                               -------    ------
Cmdlet          Add-VMAssignableDevice                             2.0.0.0    Hyper-V
Cmdlet          Add-VMDvdDrive                                     2.0.0.0    Hyper-V
Cmdlet          Add-VMFibreChannelHba                              2.0.0.0    Hyper-V
Cmdlet          Add-VMGpuPartitionAdapter                          2.0.0.0    Hyper-V
Cmdlet          Add-VMGroupMember                                  2.0.0.0    Hyper-V
Cmdlet          Add-VMHardDiskDrive                                2.0.0.0    Hyper-V
Cmdlet          Add-VMHostAssignableDevice                         2.0.0.0    Hyper-V
Cmdlet          Add-VMKeyStorageDrive                              2.0.0.0    Hyper-V
Cmdlet          Add-VMMigrationNetwork                             2.0.0.0    Hyper-V
Cmdlet          Add-VMNetworkAdapter                               2.0.0.0    Hyper-V
Cmdlet          Add-VMNetworkAdapterAcl                            2.0.0.0    Hyper-V
Cmdlet          Add-VMNetworkAdapterExtendedAcl                    2.0.0.0    Hyper-V
Cmdlet          Add-VMNetworkAdapterRoutingDomainMapping           2.0.0.0    Hyper-V
Cmdlet          Add-VMRemoteFx3dVideoAdapter                       2.0.0.0    Hyper-V
Cmdlet          Add-VMScsiController                               2.0.0.0    Hyper-V
…

PS > get-command -module Hyper-V | Out-GridView
To make it easier to search for commands, pipe the output to the Out-GridView cmdlet. It also pays to update the help files before you begin with Hyper-V and PowerShell.
PS > Update-Help -Module Hyper-V
Ok, let’s explore how you can automate many of your Hyper-V maintenance tasks with PowerShell.
Also Read: What is Microsoft Azure cloud computing?
Configuring Hyper-V Host
Although you have installed Hyper-V on your machine, it is not yet completely configured and adapted to your environment. Firstly, let us see the characteristics of our Host with the Get-VMHost cmdlet, not to be confused with Get-VM cmdlet which displays the VMs that are running on the host. I will come back to the latter command in the next section:
PS > Get-VMHost

Name LogicalProcessorCount MemoryCapacity(M) VirtualMachineMigrationEnabled
---- --------------------- ----------------- ------------------------------
DESKTOP-CAKCHQH 4 3975.2734375 False

PS > Get-VMHost | Select *
Most cmdlets do not display all the available properties. To change this, we must add the Select-Object cmdlet and then add the wildcard *.
What are these properties?
- The name of the server (In my case it is my Windows 10 laptop),
- The number of logical processors it has,
- The amount of memory,
- And finally, whether the live migration is enabled.
This cmdlet accepts the -ComputerName parameter to query a remote host.
Note that the virtual switches are not included in the previous result. To display them, you must use the Get-VMSwitch cmdlet. You will find that this command returns no result, which is normal.
The communication between the Hyper-V host and its VMs is based on the concept of the VMSwitch. Here is a very simple diagram:
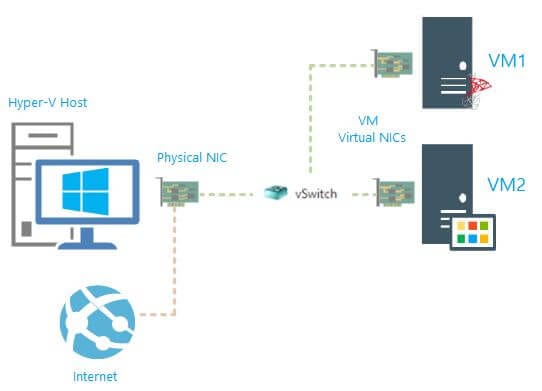
When a VMSwitch is linked to a Physical Network Adapter, then VMs will use this VMSwitch to be connected to the network; so we must identify which one will be used via the Get-NetAdapter cmdlet:
PS > Get-NetAdapter

Name      InterfaceDescription                    ifIndex Status       MacAddress             LinkSpeed
----      --------------------                    ------- ------       ----------             ---------
Ethernet  Realtek PCIe GBE Family Controller            6 Up           54-63-ED-4D-74-70         1 Gbps
Wi-Fi     Qualcomm Atheros AR9485WB-EG Wireles...      12 Disconnected 08-9E-2E-C4-2F-A4          0 bps
In the example, the adapter is called “Ethernet”. You can use the New-VMSwitch cmdlet to create a new virtual switch using Windows PowerShell. In my case, the following command is used to create a VMSwitch named “My Virtual Switch” that is assigned to the physical network adapter named “Ethernet”:
PS > New-VMSwitch -Name "My Virtual Switch" -NetAdapterName "Ethernet"

Name              SwitchType NetAdapterInterfaceDescription
----              ---------- ------------------------------
My Virtual Switch External   Realtek PCIe GBE Family Controller
For help with the syntax of this cmdlet, use the Get-Help New-VMSwitch command.
Also Read: How to Launch a Linux Virtual Machine with Amazon EC2
Creating VMs
We have configured the essentials for using our host. Here’s how to deploy a virtual machine. The first thing is to list the virtual machines already running on the host. For this, use the Get-VM cmdlet, which does exactly what its name implies:
PS > Get-VM

Name        State   CPUUsage(%) MemoryAssigned(M) Uptime      Status
----        -----   ----------- ----------------- ------      ------
prodIIStest Off     0           0                 00:00:00    Operating normally
Test02      Running 0           4096              79.03:30:33 Operating normally
VMWEB01     Running 0           4096              9.23:57:25  Operating normally
This PowerShell cmdlet returns an object, so if you need more information about a VM, add the -Name parameter and you can pipe the previous cmdlets output to the Format-List cmdlet:
PS > Get-VM -Name VMWEB01 | Format-List *


VMName                      : VMWEB01
VMId                        : c52a5b53-844b-4d49-9c96-f85801c34a95
Id                          : c52a5b53-844b-4d49-9c96-f85801c34a95
Name                        : VMWEB01
State                       : Running
IntegrationServicesState    : Up to date
OperationalStatus           : {Ok}
PrimaryOperationalStatus    : Ok
SecondaryOperationalStatus  :
StatusDescriptions          : {Operating normally}
PrimaryStatusDescription    : Operating normally
SecondaryStatusDescription  :
Status                      : Operating normally
Heartbeat                   : OkApplicationsHealthy
ReplicationState            : Disabled
ReplicationHealth           : NotApplicable
ReplicationMode             : None
CPUUsage                    : 0
MemoryAssigned              : 4294967296
…
You then get a set of very interesting properties. The output was truncated but here are some examples of the most commonly used properties:
- IntegrationServicesState: Allows you to verify whether the Integration Services are installed. For those using VMware, this is the equivalent of VMware Tools.
- Generation: Displays the version of the virtual machine (1 or 2)
- State / Status / OperationalStatus: Several properties allow to precisely verify the health of the virtual machine.
- Uptime: Execution time of the VM
- MemoryAssigned: Memory assigned to the virtual machine
- Path: Where the *.VHDX files are located
- ProcessorCount: The number of processors assigned to the virtual machine
For PowerShell One-Liners, you can easily get these properties for all your VMs:
PS > Get-VM | where {$_.state -eq 'running'} | sort Uptime | select Name,Uptime,ProcessorCount,@{N="MemoryMB";E={$_.MemoryAssigned/1MB}},Status,Generation,Path,IntegrationServicesState | Format-Table –AutoSize

Name     Uptime      ProcessorCount MemoryMB 		 Status Generation  Path  IntegrationServicesState
----     ------      -------------- -------- ------------------ ----------  ----  -----------------------
VMWEB01  10.00:46:01              2     4096 Operating normally 		 1  D:\VM\VMWEB01     Up to date
Test02   79.04:19:09              2     4096 Operating normally 		 1  D:\VM\TEST\Test02 Up to date
Let us now see the next administration task that you will use: Create your first VM. We use several parameters:
- Name: corresponds to the name of the VM
- MemoryStartupBytes: corresponds to the amount of memory allocated
- SwitchName: corresponds to the VMSwitch name previously created
- NewVHDPath: corresponds to the location where the VHDX file will be stored (This file corresponds to the VMDK file for VMware)
- NewVHDSizeBytes: corresponds to the VHDX file size
PS > New-VM -Name "VMTest" -MemoryStartupBytes 1GB `
  	-SwitchName "My Virtual Switch" `
  	-NewVHDPath "C:\users\Nicolas\Documents\Hyper-v\VMTest.vhdx" `
  	-NewVHDSizeBytes 20GB

Name   State CPUUsage(%) MemoryAssigned(M) Uptime   Status             Version
----   ----- ----------- ----------------- ------   ------             -------
VMTest Off   0           0                 00:00:00 Operating normally 8.0
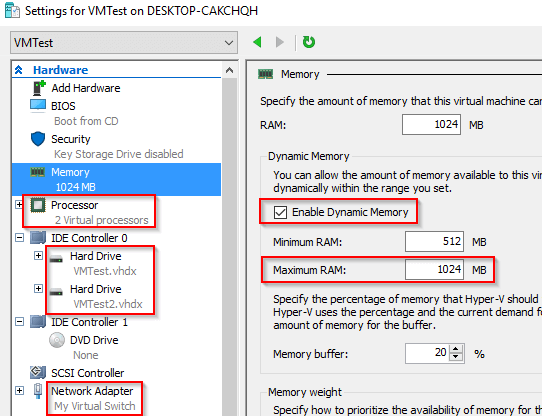
The machine is created and is stopped. Some actions can only be made after the creation of the VM, such as increasing the number of processors, increasing memory. Here are some basic actions that will be helpful for your daily tasks:
Also Read: How to Maintain Your Privacy Online
Create a second disk
PS > New-VHD -Path "C:\users\Nicolas\Documents\Hyper-v\Virtual Hard Disks\VMTest2.vhdx" -SizeBytes 10GB -Fixed

ComputerName            : DESKTOP-CAKCHQH
Path                    : C:\users\Nicolas\Documents\Hyper-v\Virtual Hard Disks\VMTest2.vhdx
VhdFormat               : VHDX
VhdType                 : Fixed
FileSize                : 10741612544
Size                    : 10737418240
MinimumSize             :
LogicalSectorSize       : 512
PhysicalSectorSize      : 4096
BlockSize               : 0
ParentPath              :
DiskIdentifier          : 43046EE3-656D-454A-A273-3B3B34DEF1D7
FragmentationPercentage : 0
Alignment               : 1
Attached                : False
DiskNumber              :
Number                  :
The file is created, all that remains is to attach it to our VM:
PS > Add-VMHardDiskDrive -VMName VMTest -Path "C:\users\DataMounts\Documents\Hyper-v\Virtual Hard Disks\VMTest2.vhdx"
PowerShell does not return us any information. So how to know if the disc is actually attached? Well, simply run the following command:
PS > (Get-VM –VMName VMTest | Select-Object VMId | Get-VHD).Path
C:\users\DataMounts\Documents\Hyper-v\VMTest.vhdx
C:\users\DataMounts\Documents\Hyper-v\Virtual Hard Disks\VMTest2.vhdx
Increase the number of processors
PS > Set-VMProcessor "VMTest" -Count 2
Increase the memory
PS > Set-VMMemory "VMTest" -DynamicMemoryEnabled $true -MaximumBytes 1GB
To check if previous actions were applied, you can of course use the Hyper-V console:
Also Read: What Is HTTPS, and Why Should I Care?
Working With VMs
Ok, let us summarize the steps made so far:
- Installing the Hyper-V role
- Configuring the Network
- Creating a VM
- Configuring the VM
The next step is to start and shut down our VMs. The following cmdlets are very easy to use, so let us first see an example:
PS > Start-VM -name VMTest
Stopping the machine is done via the Stop-VM cmdlet. This action makes the machine stop through the operating system. For those using VMware, this is equivalent of the “Guest Shutdown” option.
You may get the following error message:
PS > Stop-VM -name VMTest
Stop-VM : The virtual machine is locked. An interactive shutdown cannot proceed while the virtual machine is locked.
At line:1 char:1
+ Stop-VM -name VMTest
+ ~~~~~~~~~~~~~~~~~~~~~~~~~
    + CategoryInfo          : NotSpecified: (Microsoft.HyperV.PowerShell.ShutdownTask:ShutdownTask) [Stop-VM], Virtual
   izationOperationFailedException
    + FullyQualifiedErrorId :
Unspecified,Microsoft.HyperV.PowerShell.Commands.StopVMCommand
This means that the machine is in use by another process. To work around this, the -force parameter can be used:
PS > Stop-VM -name VMTest -Force
Note: the -TurnOff parameter can also be used. This is the equivalent of “PowerOff” via VMware.
Let us finish by touching on the Hyper-V ‘checkpoints’ concept. Checkpoints are not considered as backups, but you will still find them to be very useful. Indeed, they are regularly used before performing an action on a VM such as an update, by saving the state of the virtual machine. In this way, it is very easy to roll back to the previous state if the update fails. The official term is “Checkpoint” but cmdlets also uses the term “Snapshot” that is well known to any VMware sysadmin.
To create a checkpoint, select the virtual machine using the Get-VM cmdlet and pipe this to the Checkpoint-VM cmdlet. Use the –SnapshotName parameter to give a name. The complete command looks like the following:
PS > Get-VM -Name VMTest | Checkpoint-VM -SnapshotName “Before Upgrade”
You can easily view the checkpoints with the Get-VMCheckpoint cmdlet and remove them with Remove-VMCheckpoint:
PS > Remove-VMCheckpoint -VMName VMTest -Name "Before Upgrade"
To Go Further
The Hyper-V console is limited because it only allows you to work on a single VM at a time, unlike PowerShell which you can use to interact with multiple machines simultaneously. So, you can easily create scripts to automate tasks. Consider the following example where you want to configure all your VMs with 4 processors:
PS > Get-VM | select name, processorcount

Name   ProcessorCount
----   --------------
test                1
VMTest              2


PS > Get-VM | Set-VMProcessor -Count 4
PS > Get-VM | select name, processorcount

Name   ProcessorCount
----   --------------
test                4
VMTest              4
Another example for creating a Checkpoint on all your VMs at once:
PS > Get-VM | Checkpoint-VM -SnapshotName "Weekly Checkpoint"
PS > Get-VM | Get-VMCheckpoint

VMName Name              SnapshotType CreationTime        ParentSnapshotName
------ ----              ------------ ------------        ------------------
test   Weekly Checkpoint Standard     30.10.2016 20:12:40
VMTest Weekly Checkpoint Standard     30.10.2016 20:12:42
Finally, you will be able to plan an export of your VMS in a regular manner to backup them. Save the following lines in “ExportVM.ps1” file:
# Backup Folder
$Backup = "C:\Backup"
# Get VMs Name
$VMs = Get-VM | select name

# Delete Backup Folder and create it again
if((Test-Path -Path $Backup)){
    Remove-Item $Backup -force -recurse -erroraction:SilentlyContinue
} else {
    New-Item $Backup -type directory
}
# Export all the VMs
foreach ($VM in $VMs)
{
    Export-VM -Name $VM.Name -Path $Backup
All that remains to do is to schedule this script to be triggered at the frequency you need:
PS > $trigger = New-JobTrigger -Weekly -DaysOfWeek Sunday -WeeksInterval 2 -At 12:00AM
$options = New-ScheduledJobOption -RunElevated

Register-ScheduledJob -Name "Weekly VM Export" -FilePath C:\Scripts\ExportVM.ps1 -Trigger $trigger -ScheduledJobOption $options


Id         Name            JobTriggers     Command                                  Enabled
--         ----            -----------     -------                                  -------
1          Weekly VM Ex... 1               C:\Scripts\ExportVM.ps1                  True
Conclusion
We have described the basic cmdlets to manage Hyper-V environment. PowerShell will help you to automate various repetitive tasks such as configuring Hyper-V in either a standalone host or Hyper-V cluster, provisioning a virtual machine or managing Checkpoints.
Each example used in this guide can be applied in bulk mode to automate the management of your environment. To learn more about a particular PowerShell command use, Get-Help.
Finally, if you want to go even further in the management and automation of Hyper-V with PowerShell, I advise you to study the new “PowerShell Desired State Configuration” feature. Indeed, DSC provides a resource named xHyper-V that will allow you to completely automate Hyper-V management.