
Introduction to Git and GitHub [Tutorial]
Git and GitHub are both widely used to help developers track, maintain, and even showcase software projects.
Git and GitHub are both widely used to help developers track, maintain, and even showcase software projects. Although what you need to know to get started is very little, it can seem daunting to comprehend if you’ve never used version control software (VCS) before and have stuck with maintaining hard copies of your projects on physical storage or have manually uploaded them to cloud storage as a backup.
There are many resources and tutorials floating around the web to learn Git, but I’ve had trouble finding a single page tutorial which covers the basics up through Pull Requests without assuming prior VCS knowledge. In my experience, certain concepts of Git are just difficult to comprehend without visual aids, in addition to the basic usage and commands.
In this article, I intend to cover the basics of using Git and GitHub: adding / committing / pushing files, cloning and forking, branching, and how to make pull requests for feedback or to contribute to another open source project. I’ll be using the Android Hello World project as a reference, but the actual code won’t matter.
There is also a quick reference for all the commands in this article at the end.
“Git” vs. “GitHub”
I often see the two terms used interchangeably, but there is a big difference:
- Git is the tool / software / program that is used to keep track of your project files — it is the “version control” system, where the word “version” here refers to the changes or revisions that you make to your project over time.
- GitHub, at its core, is simply a website designed to host projects that are being tracked using Git. Since it’s just a “hosting service,” it’s not the only website that does this — other websites can host Git projects, such as Bitbucket, though GitHub is arguably the most popular. GitHub adds on a lot of tools and views of your project that go along with version control and aid with collaborating with other people on your project (later in the article I’ll talk about one feature, pull requests).
Why Use Git?
As software engineers, we generally don’t complete a project all in one sitting and we generally have a plan for structuring the work that needs to be done. If you’re working on a personal project over a number or days or weeks, it becomes beneficial to keep track of what you accomplished on a particular day and the power to rollback changes to a previous point of time, temporarily or not, can be valuable. When collaborating with others on a team, this becomes even more important — which files where changed by which collaborators? What about when multiple collaborators want to make changes to the same file? As mentioned earlier, Git’s primary function is “version control” — organizing and tracking changes made to a project over time, regardless of whether it’s just you or a team that’s working on it.
Version Control with Git
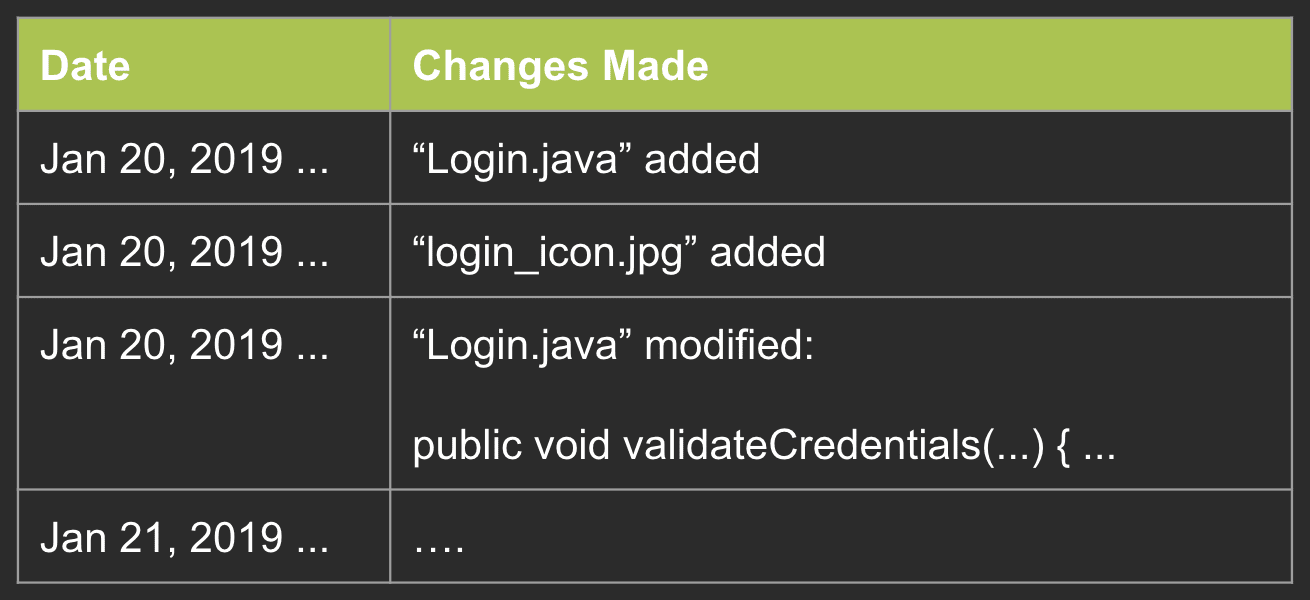
Version control is all about keeping track of every change made to every file in your project. This helps you stay organized, see what changes were made and when, and also allows you to revert changes to files or even revert your entire project to a previous state.
The simplest way we can think about representing this is by maintaining a simple table to track each file change, with a timestamp.
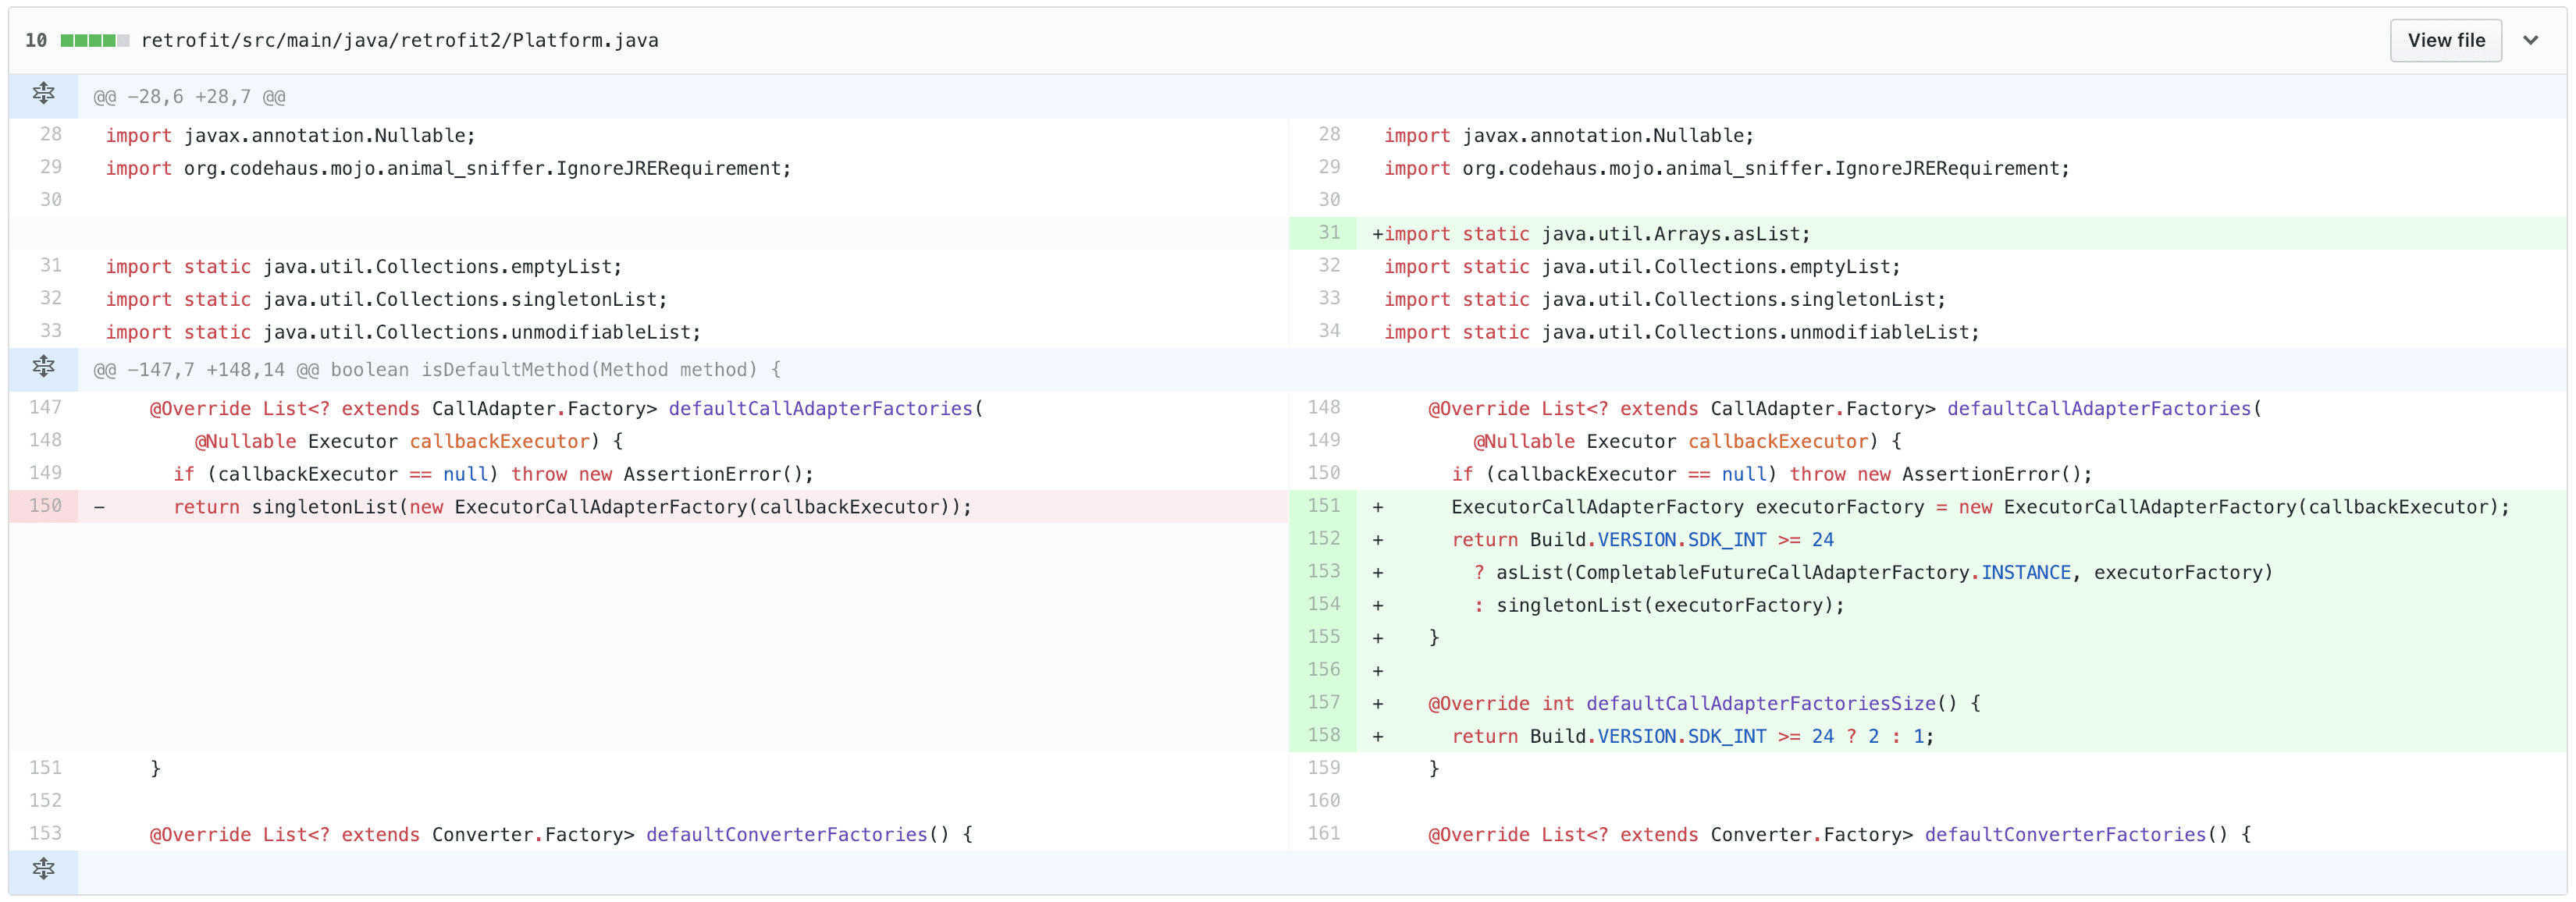
Note: we only need to keep track of the differences (the “diffs”) between the old vs. updated files, see the example below of a diff as shown on GitHub:
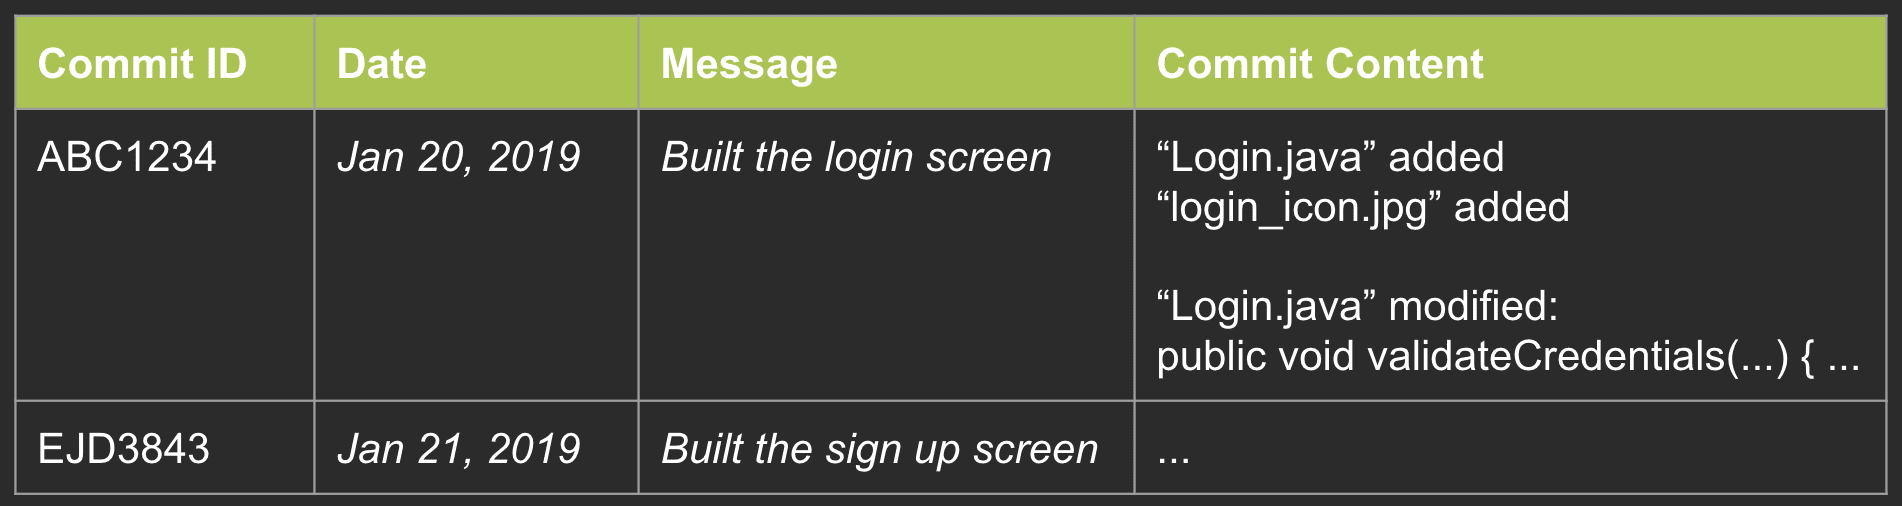
Rather than having an entry for every single change, Git organizes multiple, related changes to the project together into a single entry — in Git terms, we would call these entries commits. Commits can be organized in whatever way makes the most sense for the project and you (or your team)— for example, you might group all the work you do in one sitting together into a single commit (more on this later).
Each change is also given a unique ID, so that it can be referred to in an easy way later — for example, so that you can revert changes up to a specific ID. We can also have some descriptive text go along with each entry.
You can also think of representing this as a line with points on it, where each point is a sequential commit and will come in handy later when I discuss branching.
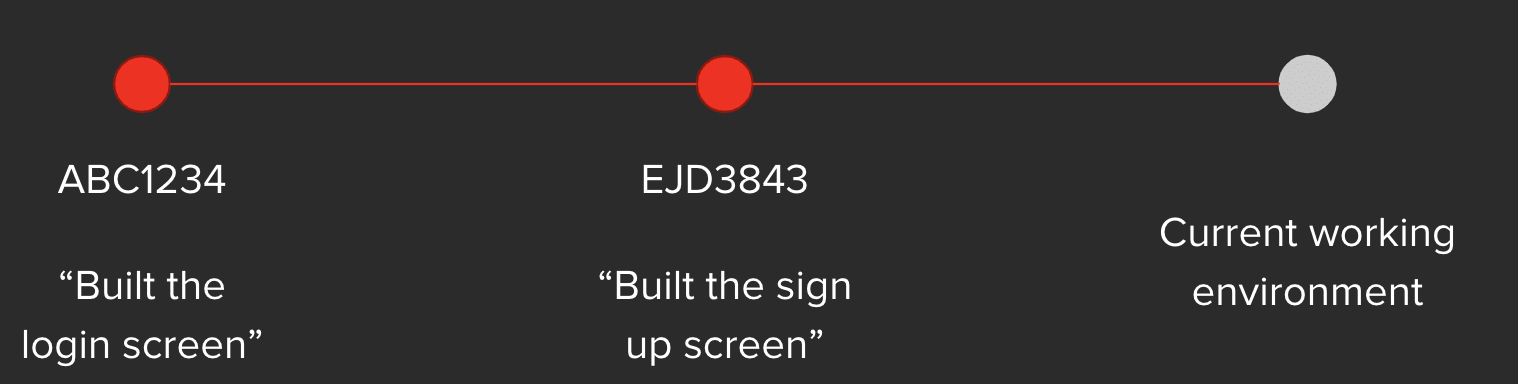
In Git terms: your project files and this history of changes to it, is known as a Git repository.
As you might imagine, this isn’t exactly the way Git maintains your changes internally, but this visualization is really all you need and also akin to the visualization you’ll see on GitHub. I have some links at the end if you are interested in the inner workings.
This section covers using Git locally to keep track of a project (e.g. without uploading it to GitHub).
Installation
Your computer may already have Git installed, you can check by running git --version from your command prompt. Otherwise, it can be installed from: https://git-scm.com/downloads
Git is installed as a command line tool, but if you are not comfortable using the command line, there are many great UI tools which you can use. One tool I like to use is Sourcetree.

Initialization
Before you can start using Git to track your project, you need to let Git do some setup. To do this, simply run git init from your project’s directory.
Any UI tool will also have this ability. For SourceTree, it’s under New -> Create Local Repository.
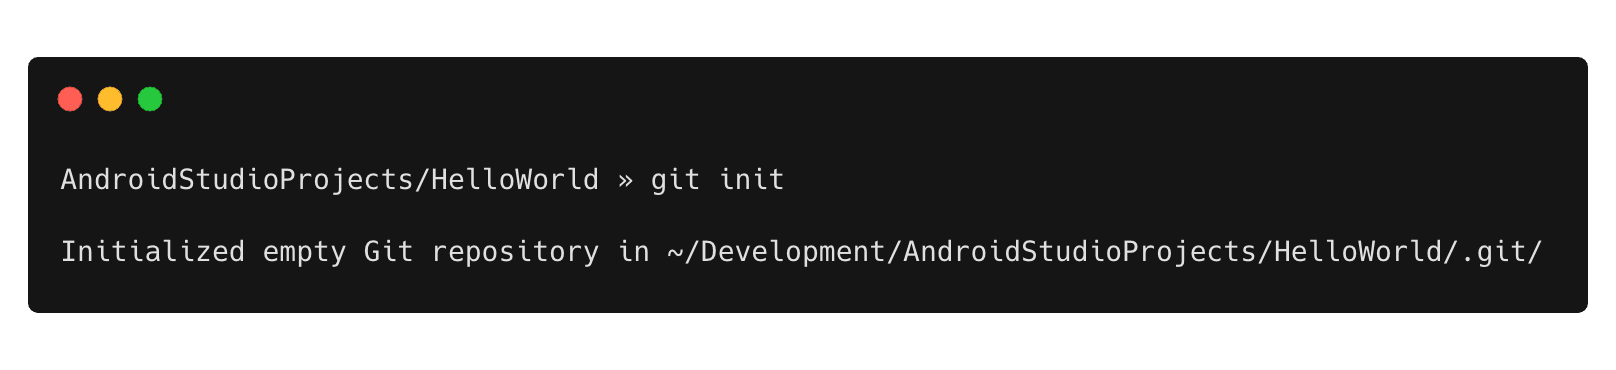

You only have to do this once for your project’s directory.
Making a Commit
By initializing the local repository, we have setup Git to track local changes, but we haven’t actually told it to start tracking any files. It’s possible that there are files you actually don’t want tracked by Git (especially if you will be pushing up the project to a public GitHub repository later) — like API keys.
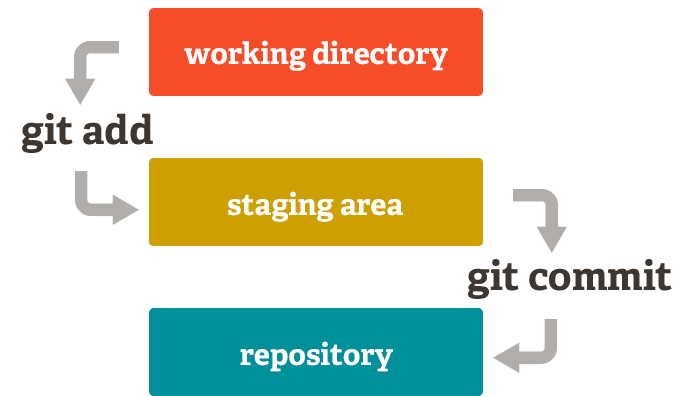
To create a commit (e.g. conceptually an entry in the table shown a few images ago), it’s a two-step process because commits group together changes made to multiple files.
Step 1 is to indicate all the files you’d like to go together in a commit. This is known as “adding” the files to the “staging area”. Conceptually, you add any changes you’d like to the staging area and then a commit is created to wrap up the changes which were staged.
It’s up to you how you want to structure your commits — for example, you could do based on time (e.g. all the code worked on in a single day goes into one commit), but generally I like to do it by major divisions of work (e.g. built a new screen, integrated with a new API, fixed a bug, etc.) — that way your history can be very clear.
In this situation with a new project, since nothing is currently tracked by git, we can just bundle the entire project together in an initial commit.
The command for staging changes is git add <path/to/file> . In place of a file path you can also put a directory to stage all changes underneath. For example, you could type git add . to add all files from the current directory downwards. You could also type git add -A as a shortcut to add all changes to the staging area.
This exception here is that you can have a .gitignore file which instructs Git never to track the files matching the sequences inside and can be useful to make sure you don’t accidentally upload, for example, your API keys to a public GitHub repo if they are in a specific set of files.
You can confirm files have been staged by typing git status.
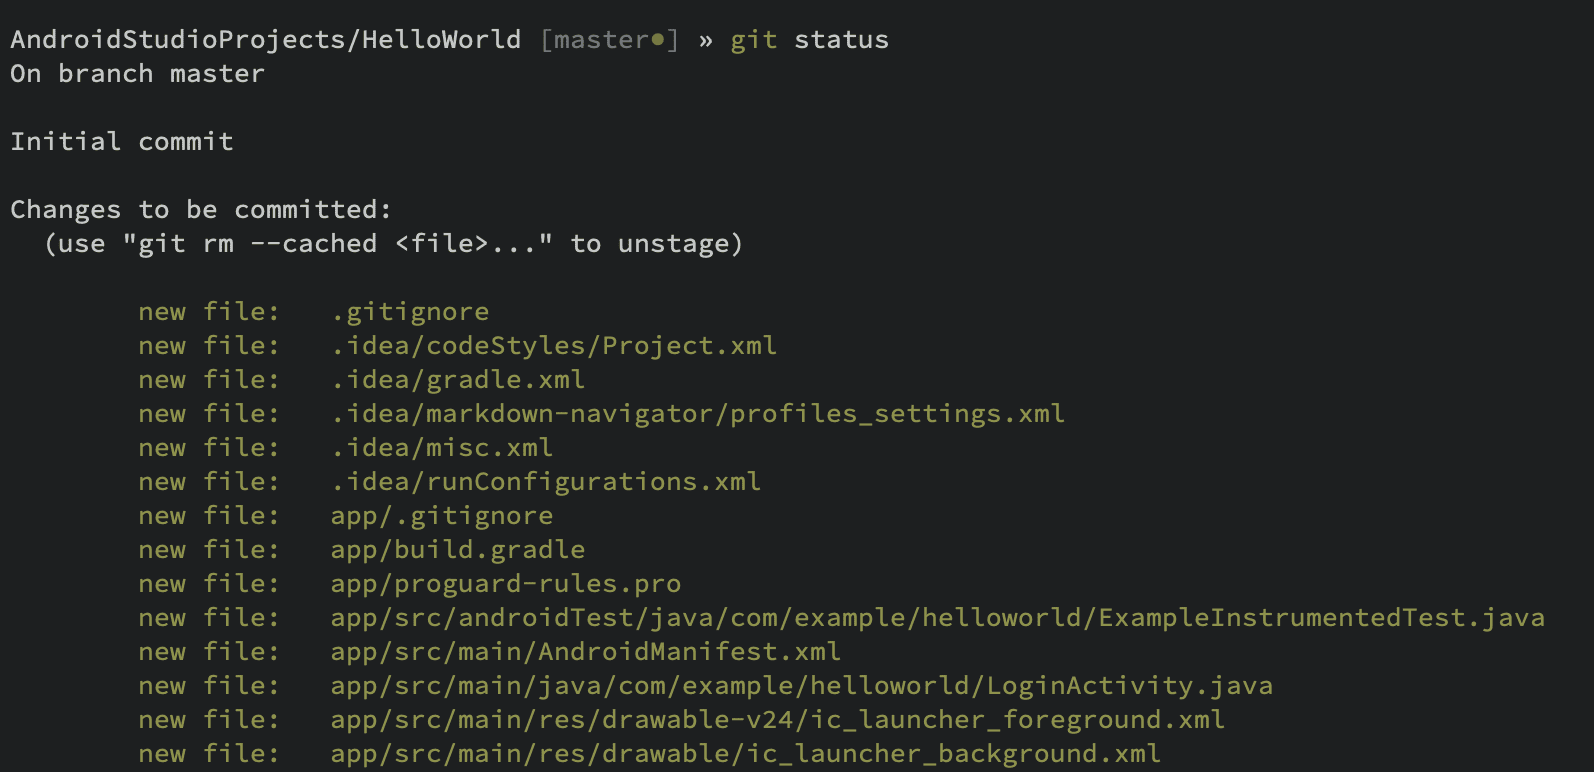
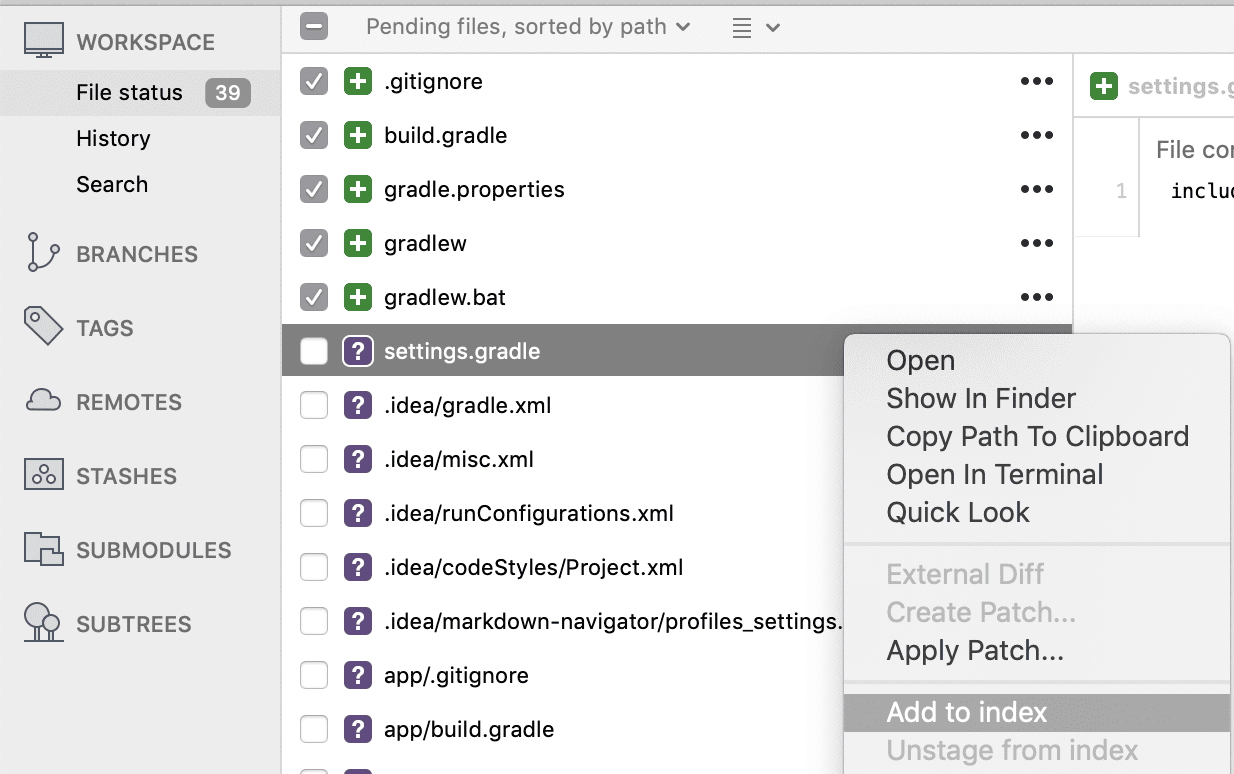
UI tools also make it easy to see the difference between unstaged and staged changes.
Once you’ve staged all the changes you want to be wrapped up into a commit, use the git commit command to actually wrap the staging area into a commit. You can use git commit -m "Some descriptive message" to describe the particular commit with a message.
# Add all files / modifications to the staging area
git add -A# Create a commit with the initial state of the project
git commit -m "Initial commit"
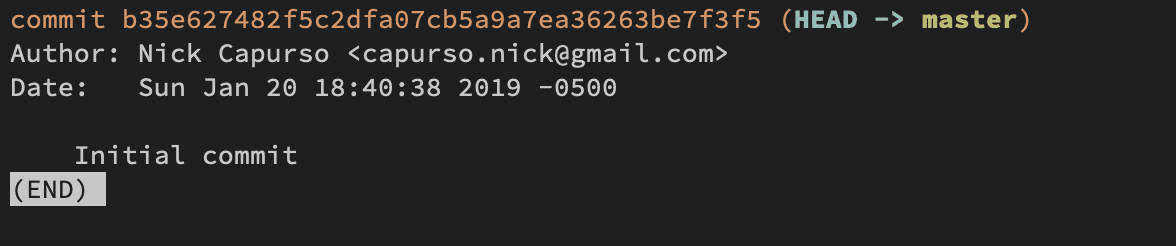
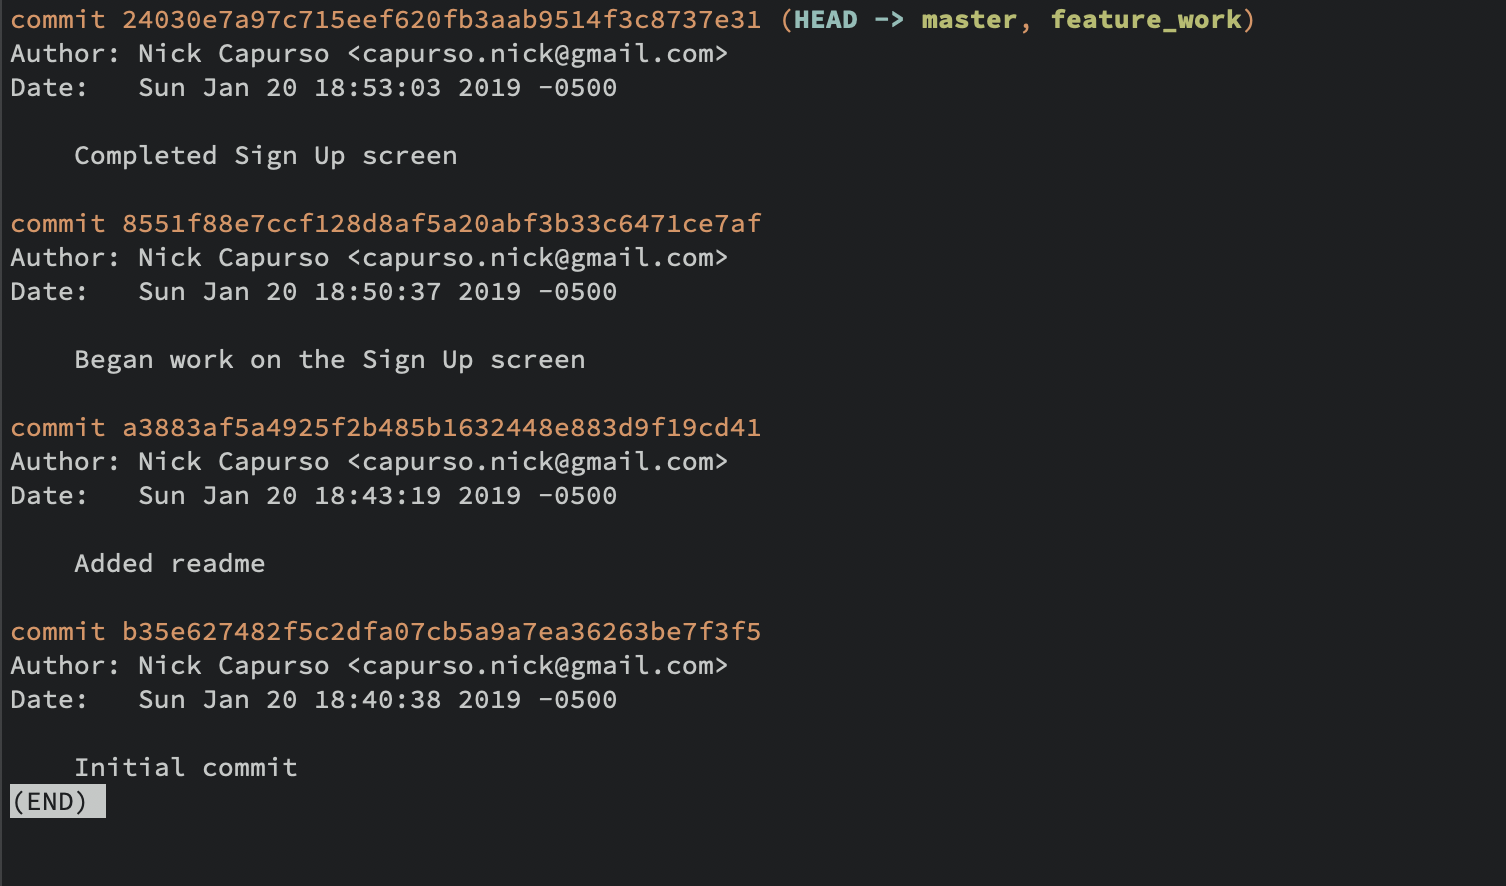
You can verify the commit was created by using the git log command to view the commit history (press Q to Quit). Since this was the first commit I’ve ever made for this project, it’s the only item listed.

As an example, we can also add a README.md file as a separate commit.
<create your readme file># Stage the readme change
git add README.md# Make the commit
git commit -m "Added readme"
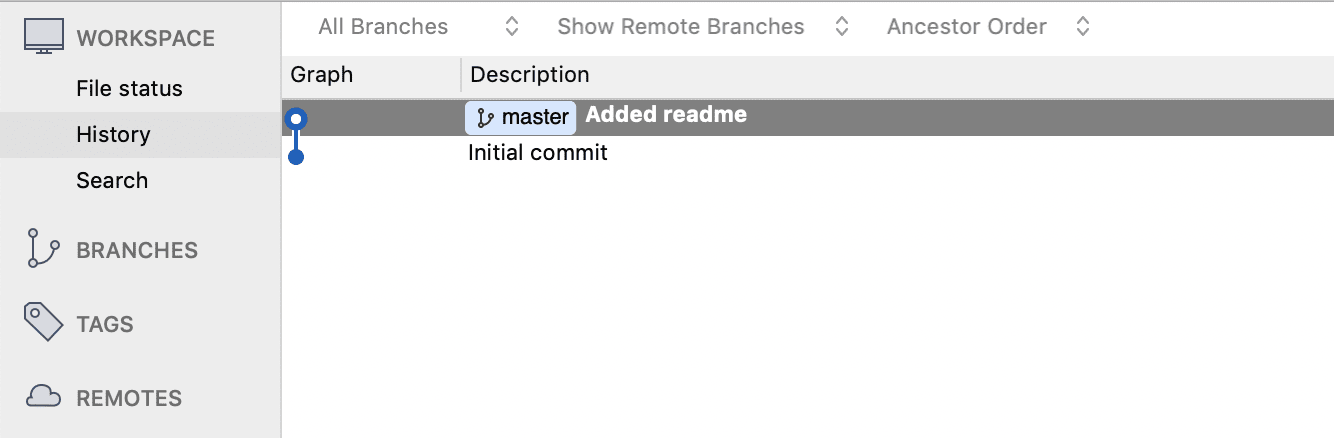
and verify that we now have two commits in the history.

You can repeat this process to continue building up your commit history.
Branches
Before talking about how we push to GitHub, there needs to be a little bit said about branches.
A “branch” can be thought of a sequential line of commits. So far we only have our one main line of commits and, by default, this is called the “master” branch.
However, you can create a new branch to commit your work to without disturbing the state of your project currently on the master branch. This can be useful when you’re working on new features which you don’t want introduced back into your main project until they are completely finished. This allows you to keep your master branch clean and only containing code which you have tested thoroughly and also allows you to switch between working on different in-progress features.
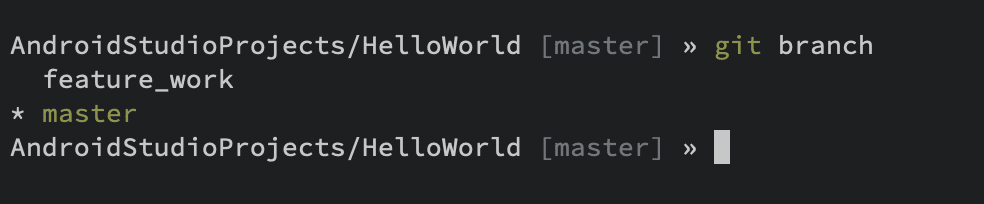
You can create a branch with the git branch <name> command or using the branch option in a UI tool.
For example, git branch feature_work will create a new branch called feature_work off of the current state of the project (e.g. if you were on the master branch at commit abcd123 your branch would also start at commit abcd123 ). You can use git branch (with no branch name) to print the current list of branches.

To switch to the newly created branch, use the git checkout command — git checkout feature_work. You can also use the shortcut git checkout -b feature_work to both create the branch and switch to it.
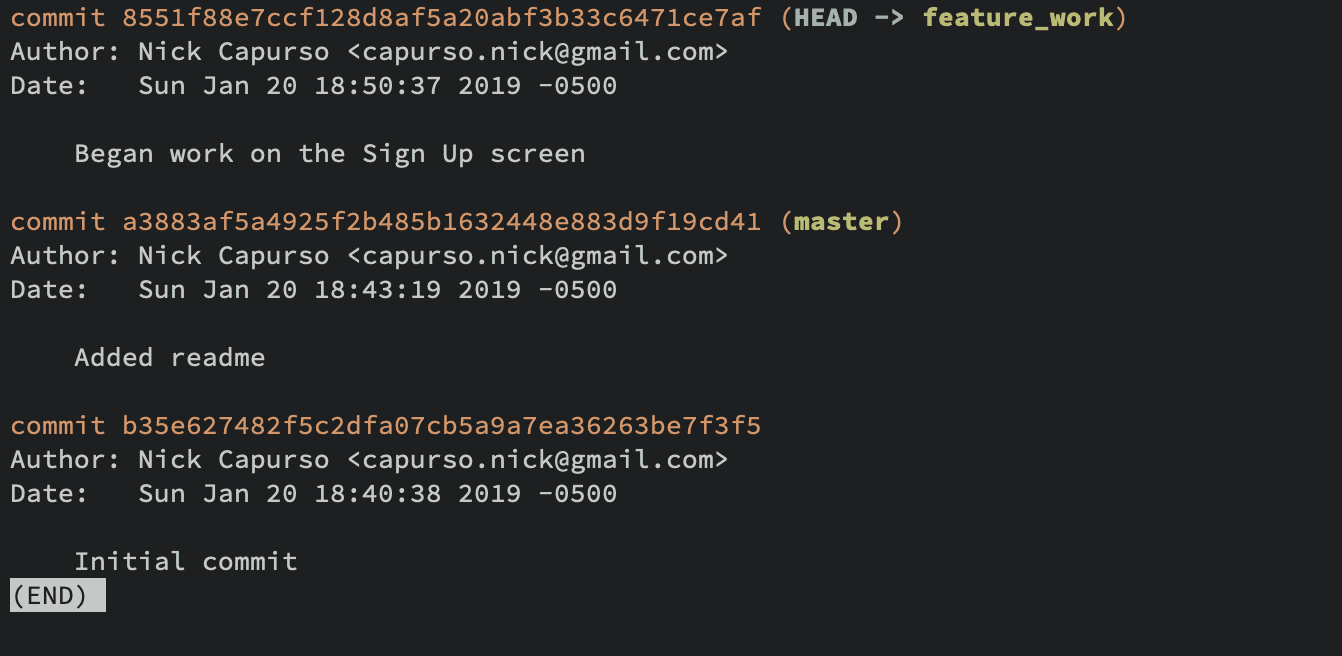
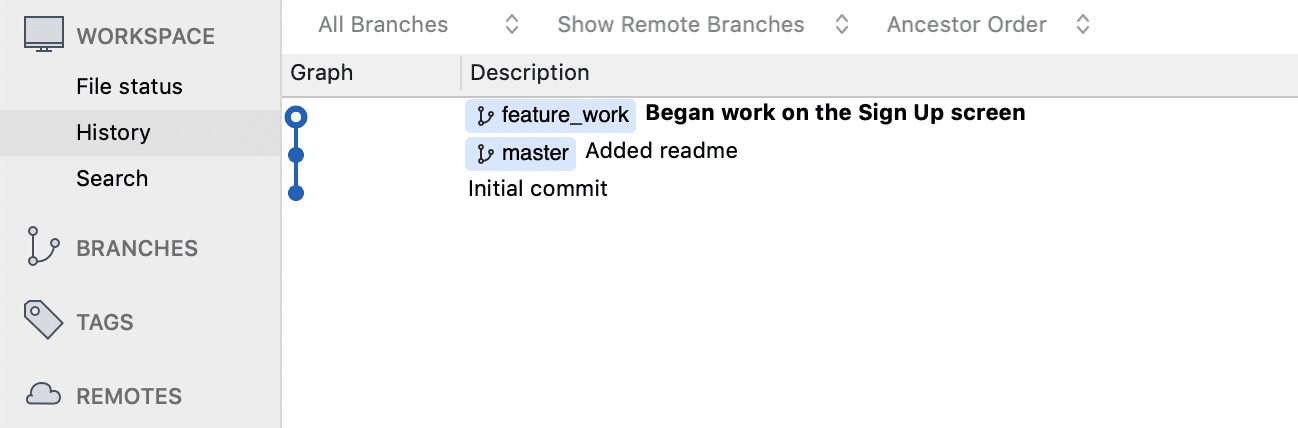
Now, if you were to add and commit some changes to your project, they would be committed to the feature_work branch, instead of the master branch.
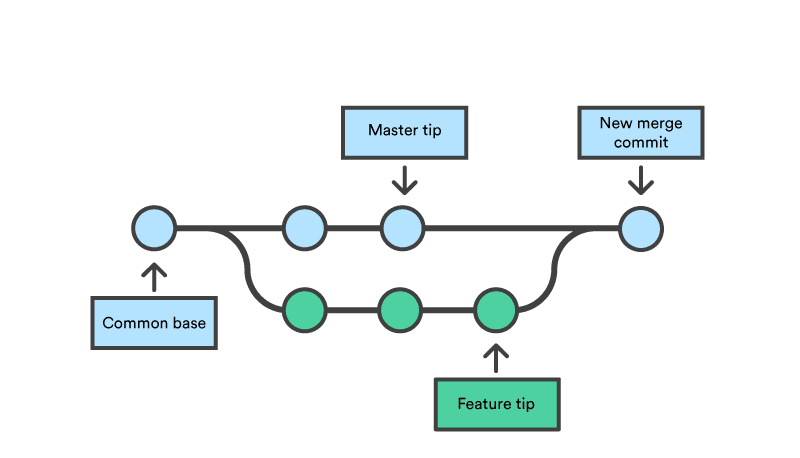
As you continue developing, your branch will accumulate commits and at some point you will want to “merge” those commits back into your master branch (e.g. when your feature is complete). To do this, switch to your master branch and use the git merge command:
# Switch to the master branch
git checkout master# Merge the feature_work branch into the master branch
git merge feature_work
Which brings the new commits in feature_work into master.

In a project with more branches and commit activity (and pull requests), you can see how the line graph diagram can represent branches in a more intuitive way. The yellow line here in the master branch.

Merging can get complicated if you work on a team, for example if two people have modified the same file and try to merge the changes back into master. You can run into a “merge conflict” where you need to resolve whose changes to keep and whose to throw away, which you can read about here.
Note: you can also use the git checkout command with a commit ID to checkout the state of the project at a previous commit — for example, git checkout abcd123 .
The material given in the last section is enough for you to start using git to track your project locally, next I’ll talk about how to push your code up to GitHub and how to work with other projects you find on that site.
Pushing to GitHub
You can create an empty repository on GitHub using the New Repository option — no need to initialize with a readme as one was created locally.
After the repository is built, take a look at the Quick Setup guide that is presented, some of the commands should look familiar.
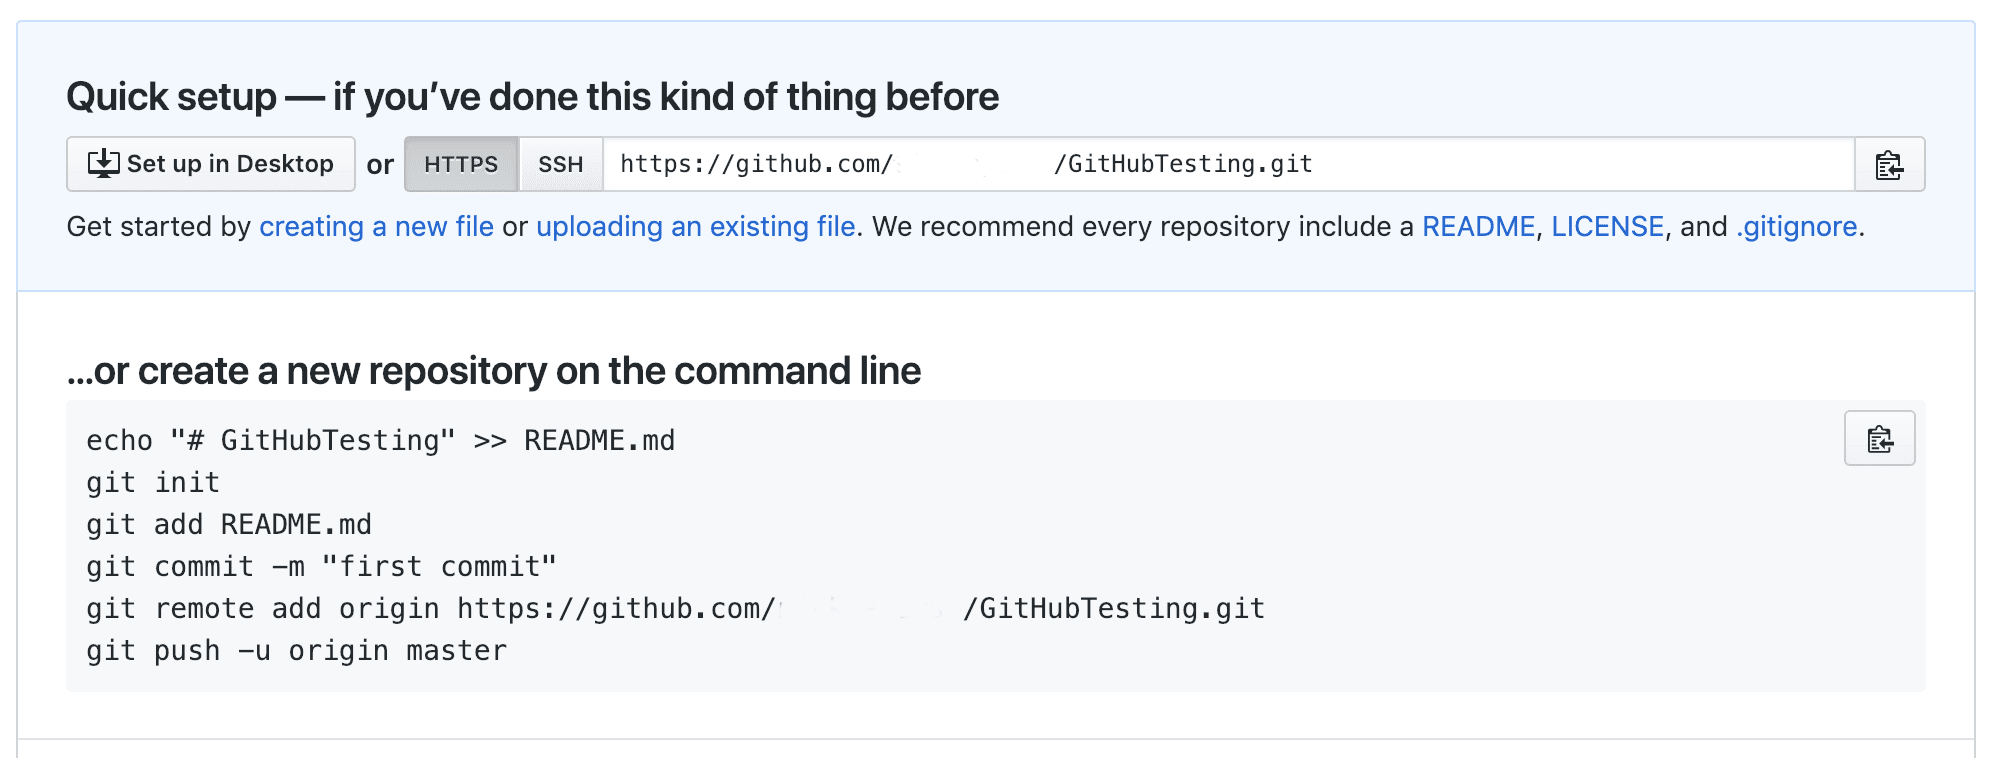
The example above shows just how you would create an empty project containing only a readme in it — git init to prepare Git locally, and then a git add and git commit to create a single commit with the readme.
The next two lines set up your local Git project to point to a “remote” GitHub project. In other words, we make our local Git project aware that we also have a “remote” (e.g. non-local) project repository. To do this, you use the git remote add <name> <URL> command, supplying it a name for the remote location and also the URL. The name can be anything, though you’ll commonly see the word “origin” used to refer to your main remote repository. But, for example, if you wanted to upload your project to both GitHub and Bitbucket, you might have a “github” remote and a “bitbucket” remote.
Once your remote is set up, use the git push command to upload your code to the remote repository. Supply the name of the remote (e.g. “origin”) and the branch to push. The -u parameter sets git up to also “track” the remote branch so that next time you don’t need to supply origin master.
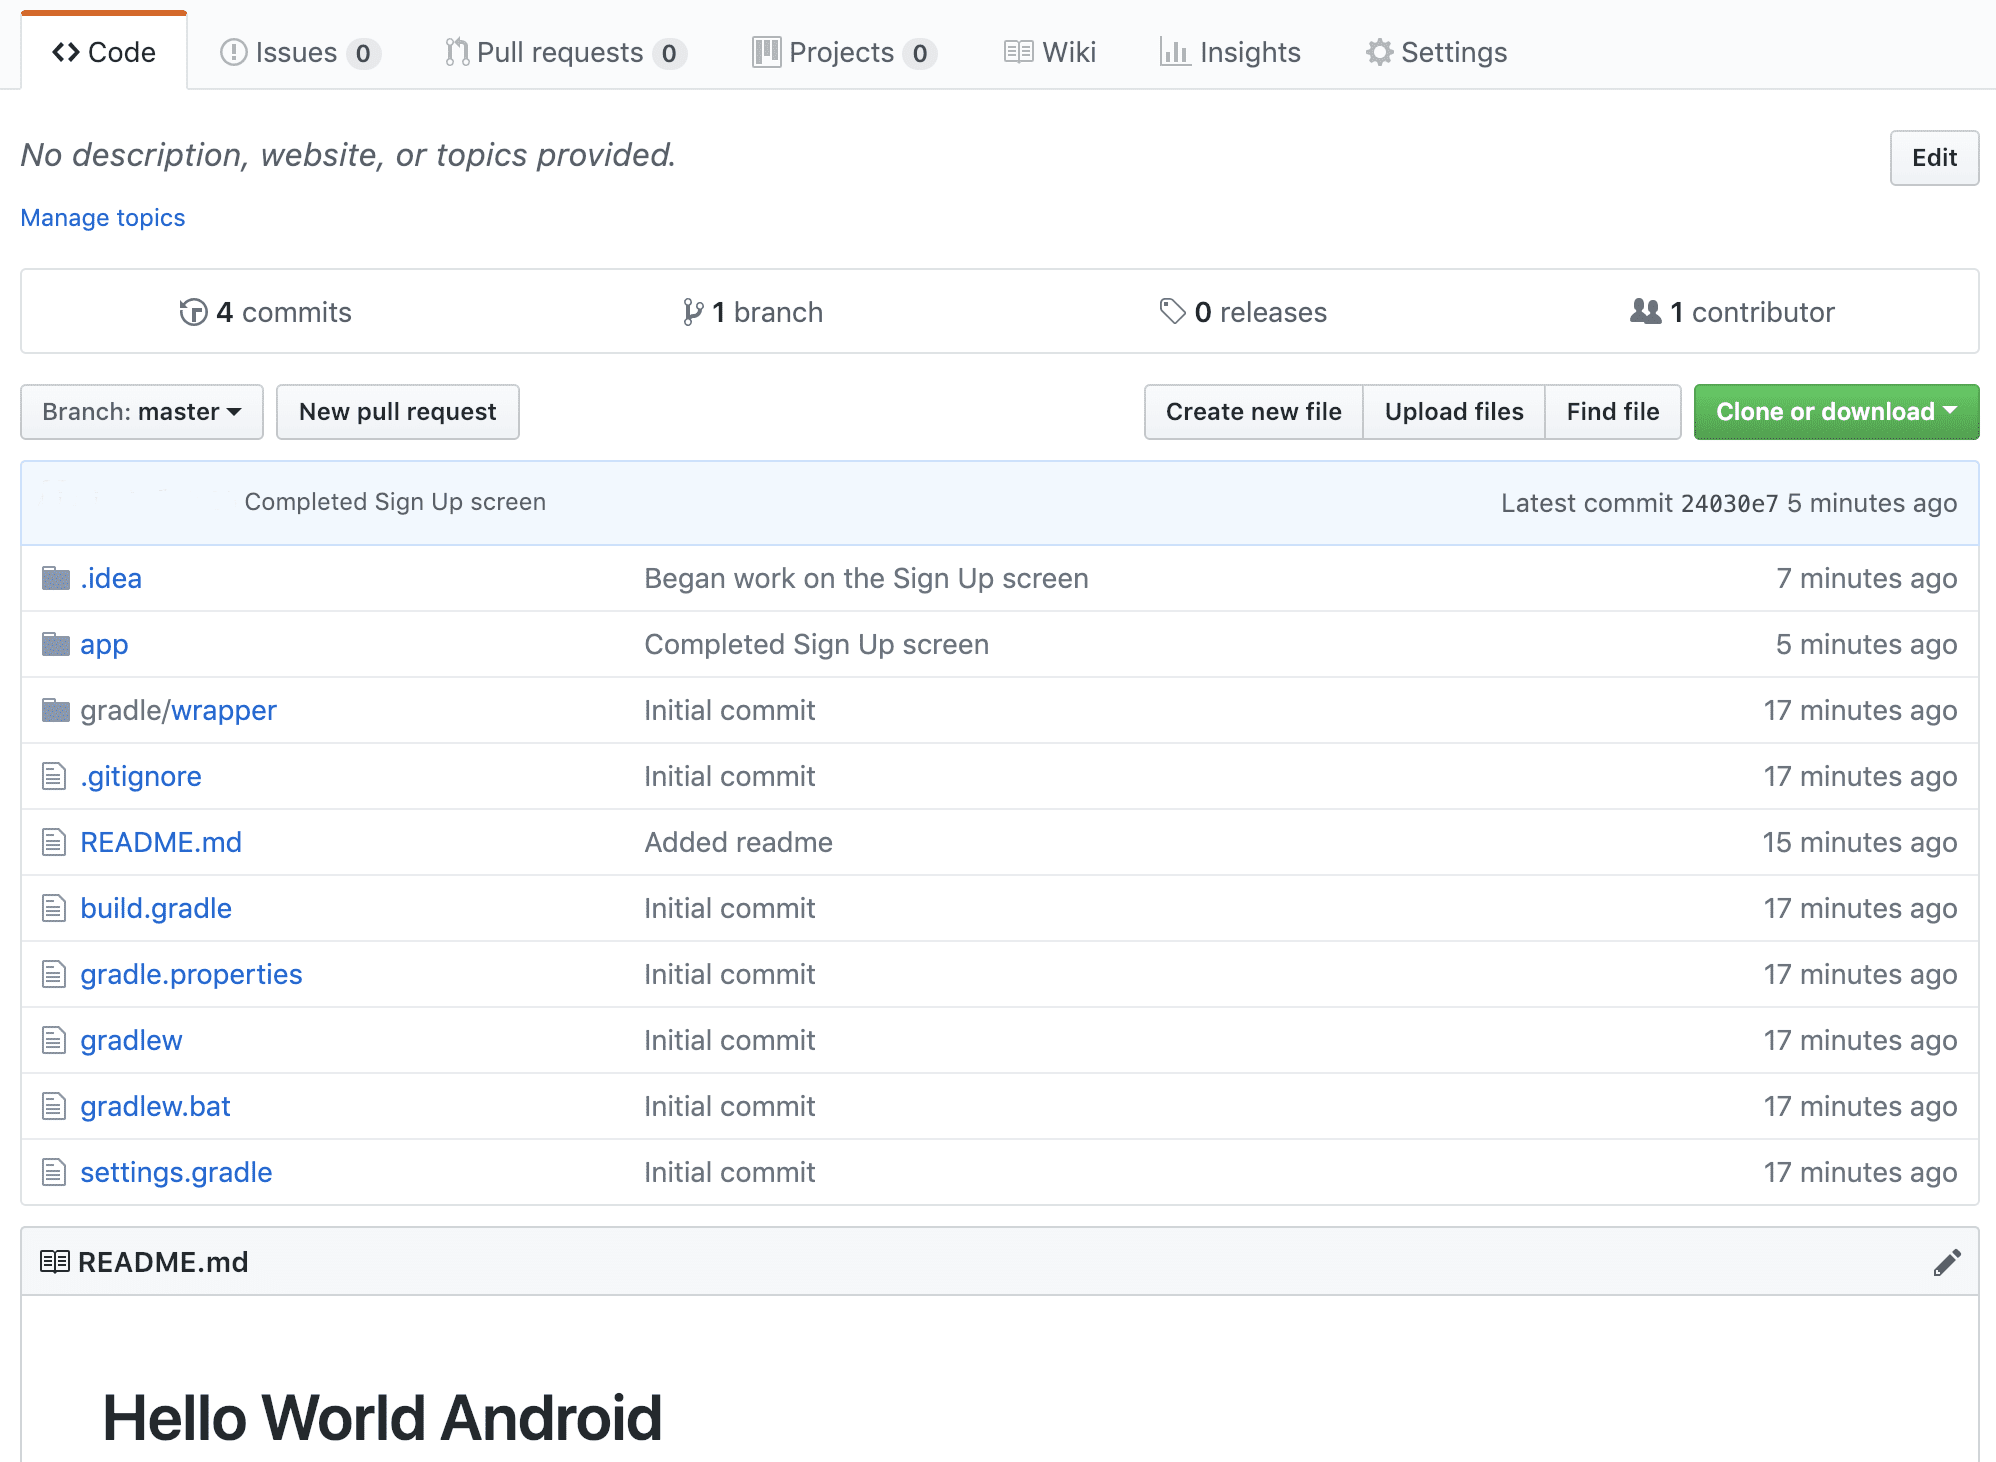
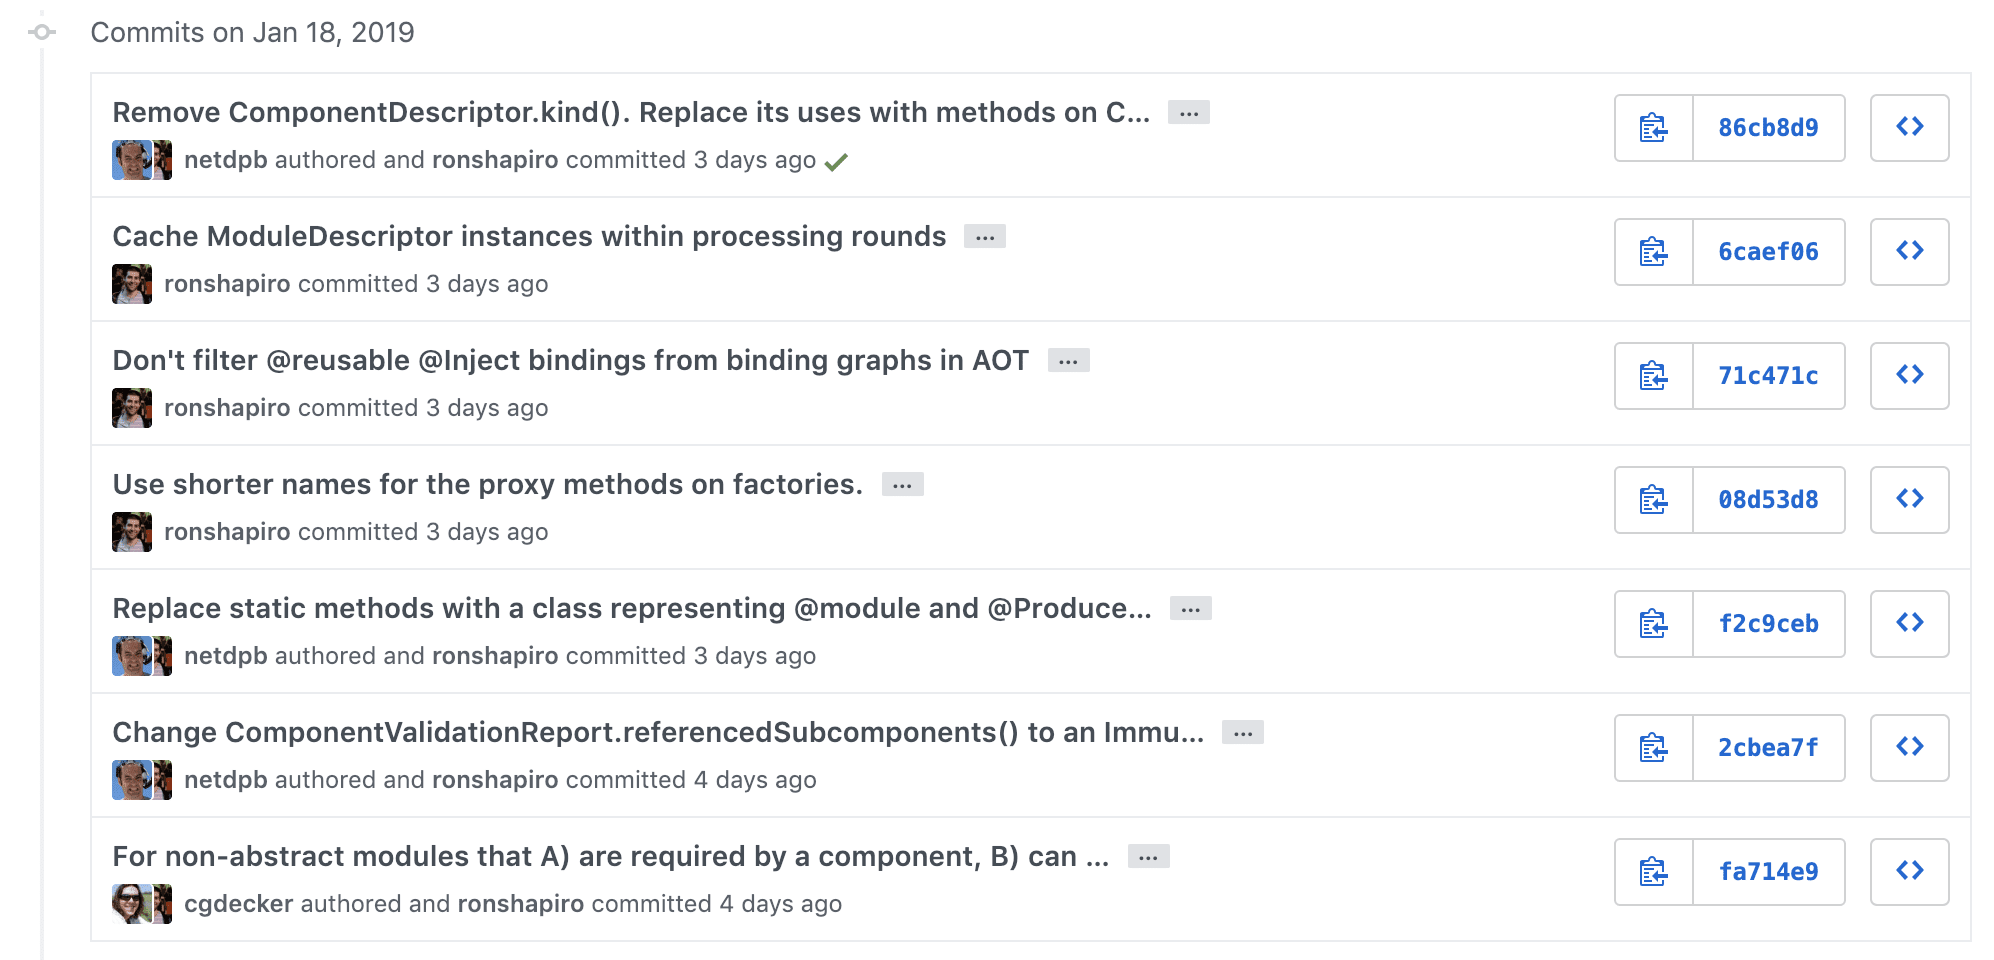
Notice how, when your project is pushed up to GitHub, you can view the commit history that you built up locally.
Now, your general development loop just contains an extra step to push your code up to GitHub where you not only have a nice UI to explore your project, but it also serves as a backup should something happen to your local environment!
# Make your changes to the codebase
...# Stage all of your changes
git add -A# Make the commit
git commit -m "..."# Push to GitHub (assuming the master branch)
git push origin master
Note: you can also push non-master branches up to GitHub too!
Cloning and Pulling
If you have GitHub repository, or find one that you’re interested in downloading to your machine, the easiest way is to clone it.
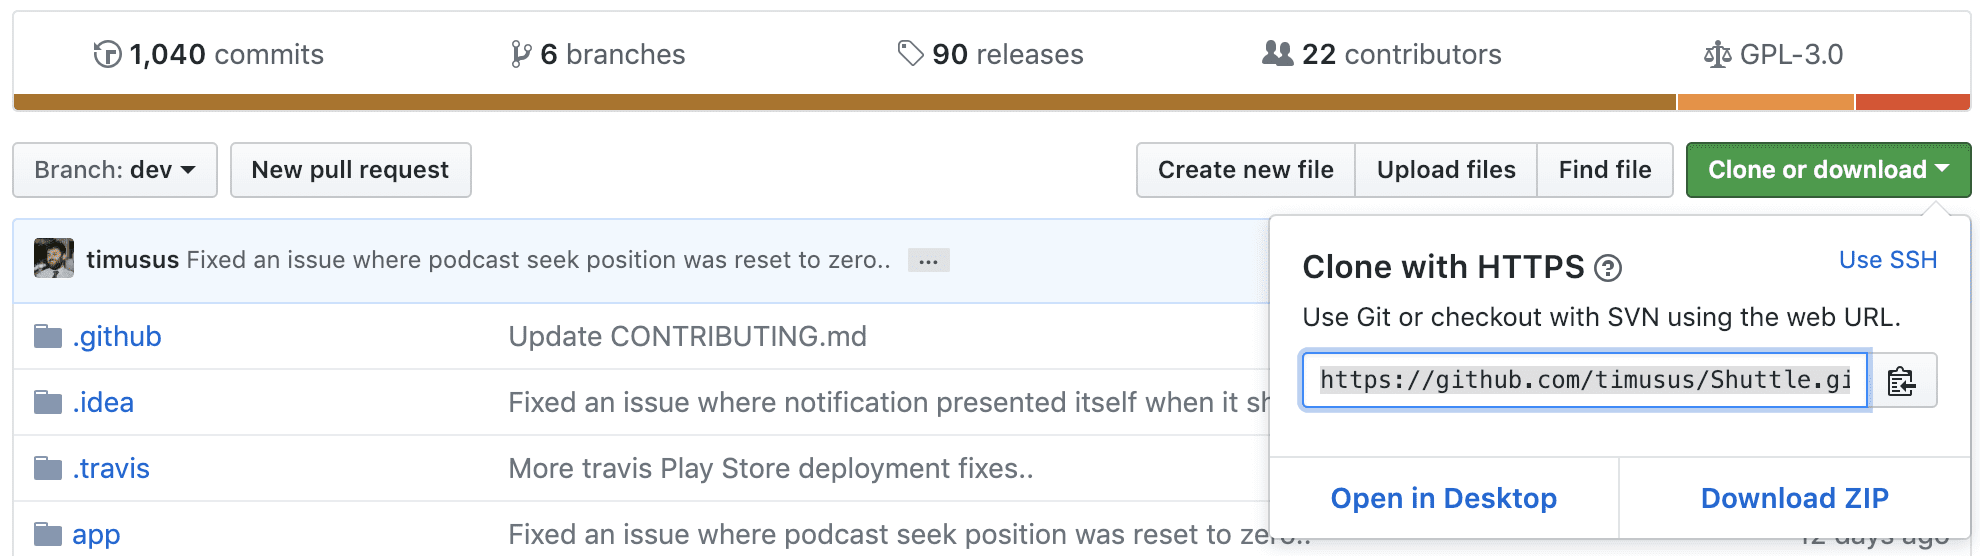
Use the URL specified in GitHub and use git clone <URL> to download (clone) the repository into your current directory or use your UI tool’s clone function. When you clone a repository, it also brings along the git metadata — so you will have access to the commit history, as if it was your own project (e.g. no need to do a git init ).
Note that if the project on GitHub has new commits added to them, you won’t receive those changes to your local project automatically. In order to pull updates into your local repo, use git pull and supply the remote and branch name to pull the updates from (e.g. git pull origin master to pull down the latest changes to the remote master branch into your current branch).
Forking
GitHub repos can have access rules applied to them. Generally if you’re the owner of a repo, then only you can push to it.
However, you might be interested in contributing to an open source project, so how can you do that if you can’t push your changes back to the repo?
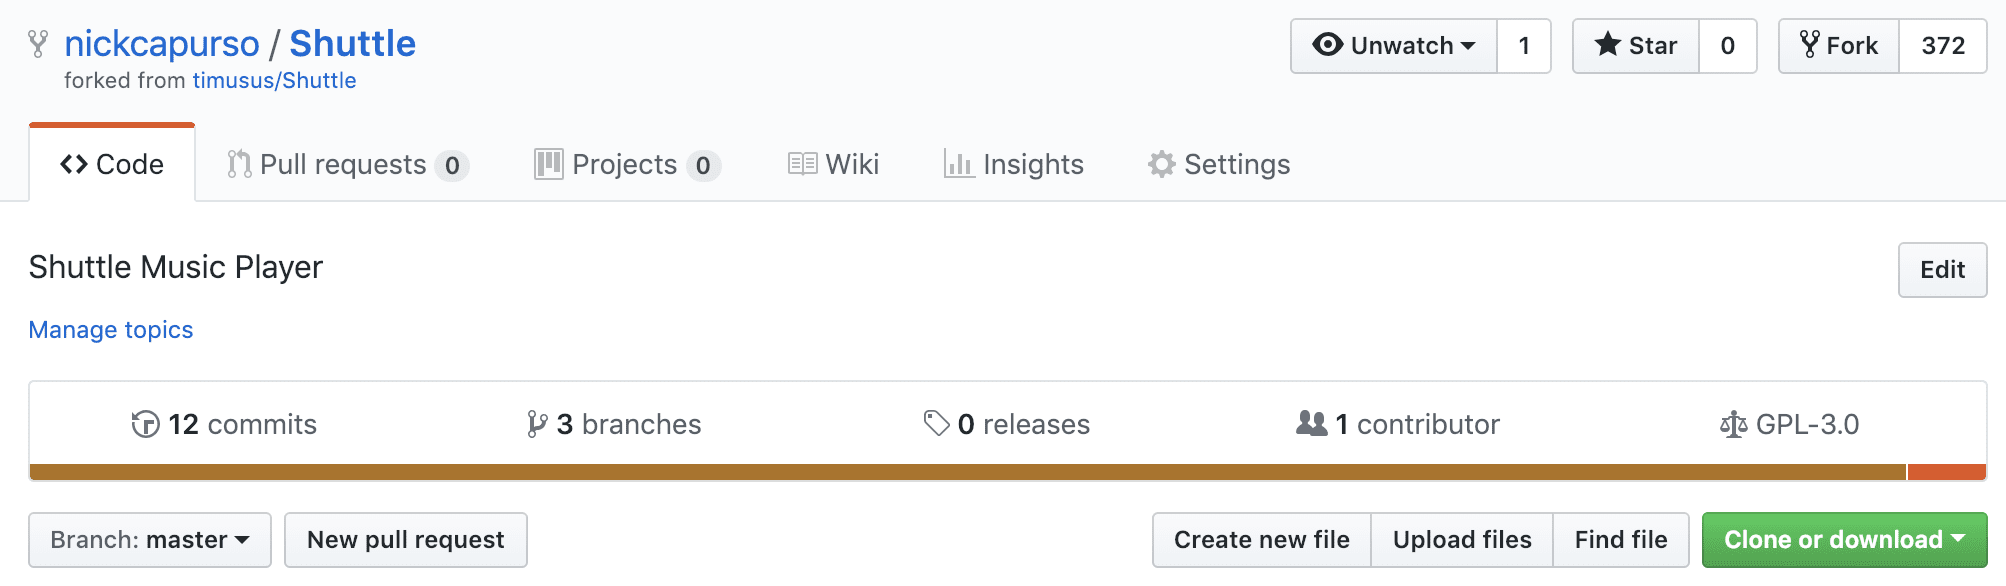
One option is to “fork” the repository — which copies the repo into your personal GitHub space (which you have the rights to push to). So, you can fork the open source repo, then clone your fork to your local machine. You can make updates locally and then push your changes back to your fork on GitHub.
Like with cloning a repo, your fork will not stay up to date with the original (or “upstream”) project. You may want to pull updates from the upstream project, in which case you would need to set up a remote to reference the upstream project — so you’d have two remotes: one to reference your fork (probably called “origin” by default) and one to reference the upstream project.
# Add a remote to track the original upstream project
git remote add upstream <URL to upstream project># Verify that you now have two remotes (including the one to reference your fork)
git remote -v
...# Now you can pull changes from the upstream repo
git pull upstream master
The final piece is how you can get your changes back into the original project repo, which is where Pull Requests come in.
If you do have access to push to a shared repo (for example, working on a team), then your team may have norms about doing so and Pull Requests are still a good option here.
Pull Requests
A Pull Request (PR) is simply a “formal” request to pull changes made in one branch / repo into another branch / repo — a common example being to request that your changes to a fork of an open source project be accepted into the main project’s repo. A PR specifies the source and destination repos and branches, the commits to be pulled in, and allows the requestor to write a description of the change. In turn, the maintainers of the open source project can provide feedback, request additional changes be made, and ultimately choose to accept the pull request and merge the commits in.
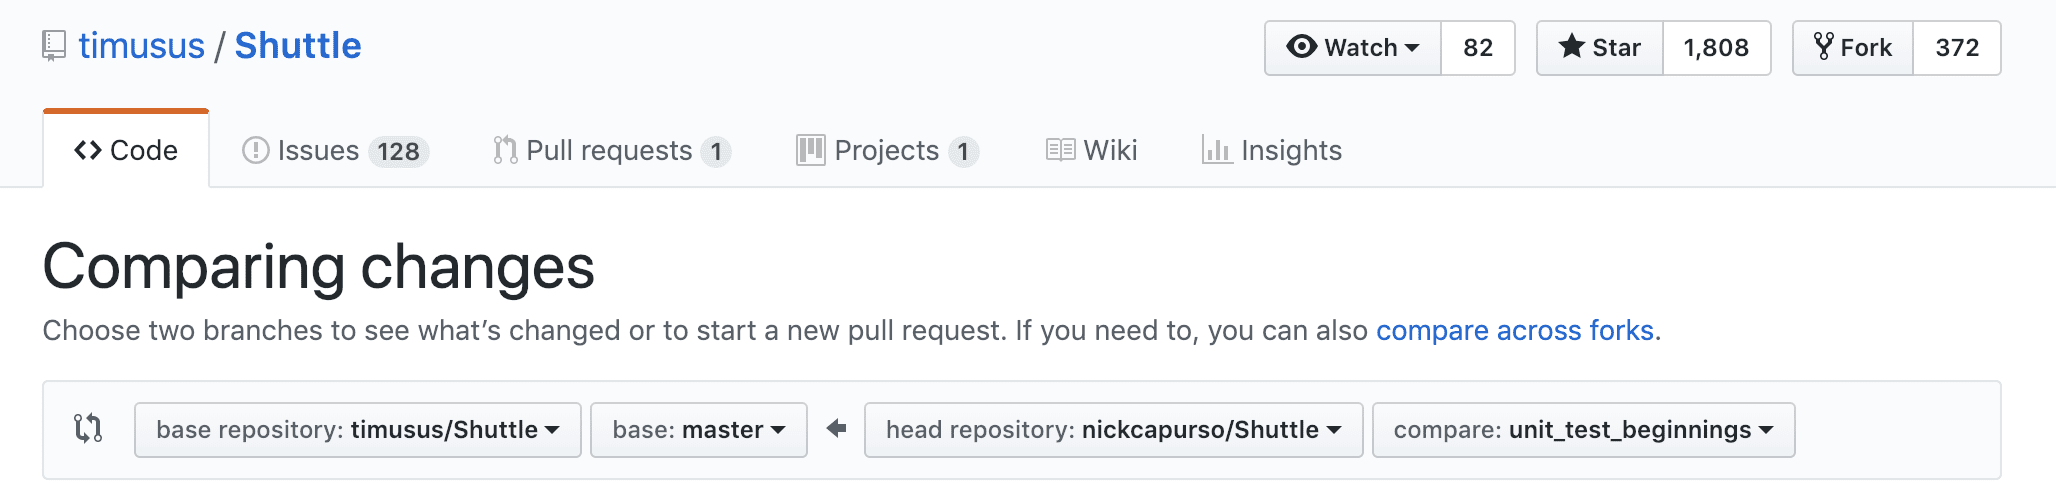
To open a pull request using your fork, make sure your commits are pushed up to the fork, then press the “New pull request” button, then the option to “compare across forks”. Finally, choose your fork and branch to open the pull request from and the destination branch (e.g. “master”) that you’d want the changes to be pulled into.
It’s very common for open source projects to use some sort of branching model to organize commits and develop. For example, Gitflow uses a two-branch system: the “master” branch contains the current “stable” version of the project and a separate “develop” branch contains the current line of development. So, in this case, your PR should target the “develop” branch instead of “master”.
You can also use Pull Requests within your own personal repos or shared projects that you have push access to. In this case, there are no forks involved and you can simply open up a pull request between two branches of the project. For example, in the earlier example with the feature_work branch — instead of merging it into master locally, we could push the feature_work branch to GitHub and open a PR to merge it into master.
After your pull request has been merged, make sure you use a git pull to update your local branch(es) with the new changes.
Closing
There are tons of resources out there for learning Git or GitHub that you can look to if you need more depth in any of these topics (you can even get a free book — Pro Git!). As I mentioned in the introduction, I wanted to write up a guide that covered the basics up through pull requests in a way that I wanted the information to be conveyed. A lot of the learning curve for picking up version control for the first time is just wrapping your head around all these new concepts, but once you have the basics down you can quickly start to reap the benefits of having an organized project, being able to efficiently collaborate with others, and also the ability to contribute back to the open source community.
Other Resources
Here are some other Git resources I also recommend:
- Atlassian’s collection of Git tutorials
- Pro Git — for free on Git’s website also dives into the internals of Git.
- Kevin Cooper’s Git Tutorial, which goes into more detail on the shell commands and branching.
- Vincent Tunru’s Git Tutorial, which has some amazing graphics to help visualize commits and branching.
Command Reference
Here’s a list of the commands used in this article. All of these should have a counterpart if you are using a UI tool for Git.
git init— initializes the current directory as a Git repo.git add <path>— adds the file or directory to the staging area. Usegit add -Ato stage all changes.git commit -m "Some message"— wraps the staging area into a commit, described by the message given.git status— list out the currently unstaged and staged changes.git log— view the commit history.git branch <name>— create a new branch.git branch— list all branches in the repo.git checkout <branch or commit ID>— switches to the specified branch. Or, checks out the state of the project at that particular commit.git checkout -b <name>— shortcut for creating the branch if it doesn’t exist and switching to it.git merge <branch>— Merges the specified branch with the current branch, pulling in any new commits.git remote add <name> <URL>— Adds a new remote repository at the specified URL which can be referenced using the supplied name.git remote -v— View currently configured remotes.git push <remote> <branch>— Pushes the specified branch to the remote repo. Use-uto set up tracking so next time you can just usegit push.git clone <URL>— Pulls down the remote repo to your local machine.git pull <remote> <branch>— Pulls down the remote branch and merges any new changes into the current branch. If you previously pushed with the-uflag, you can omit the remote and branch.